Friday, October 31, 2014

APS Paralleling Made Easier through Programming

Hi Everyone,

The Advanced Power Supply family has a very slick way to parallel units for higher current called current sharing.  This enables all of the paralleled units to be in Constant Voltage (CV) mode which is a change from most of our other power supplies that have one unit in CV mode and the rest of the units in Constant Current (CC) mode.  My colleague Ed did a very informative blog post about the different paralleling options that explains a bit more about paralleling units so I will not rehash any of that here.  Here is a link to that post: Paralleling Power Supplies.

The main drawback of the paralleling on the APS is that it can be a little difficult to get everything properly set to get the best performance.  You need to synchronize your current measurements and your voltage transients.  If you look in the manual, there are quite a few pages explaining how to set this all up.  I am happy to say that we have made this a little easier.  Our summer intern spent some time writing a VBA program in Excel that automatically does much of this.  The program uses Keysight VISA-COM so you need to have the Keysight IO Libraries installed to use it.  It will work with LAN, GPIB, and USB (all of which come standard on all APS units).

The first thing that we need to do is talk about the setup.  There are quite a few wire connections that need to be made.

First you need to connect the current sharing ports, the sense connections, and the outputs to the load:

After that, you also need to make some connections on the 8 pin  digital connector on the back of the APS units. You do not need to worry about setting up the pins if you plan on using the default pin assignments from the program.  The default pin assignments are:

Pin 6 on all units - On Couple
Pin 7 on all units - Off Couple
Pin 1 on the master unit - Trigger Out
Pin 1 on all other units - Trigger In
Pin 8 on all units - common

Here is a wiring diagram of the default assignments (for 3 units):


The On/Off Couple Pins make it so that when you enable or disable the output on any unit, all of the units enable or disable. The trigger line enable us to synchronize measurements as well as voltage changes.  

The Interface looks something like this:

It is divided into four boxes.  I will refer to them as boxes 1 to 4 with 1 being the left most box.  Box 1 is where you enter the VISA initialization string for each paralleled supply.  You can get this from the Keysight IO Libraries.  Box 2 is where you enter your settings  You can set the voltage limit, positive and negative current limit, change the output state, and change the voltage.  Most importantly, this is where you set the number of paralleled units.  This needs to be done or else the program will not work correctly.  You can parallel 1 kW and 2 kW units with each other, as long as they have the same maximum voltage so we also need to break out the number of 2 kW units in the scheme.  The third box will do a scalar measurement of the voltage and current.  This will report the total current of the paralleled units (it does a triggered measurement and adds all of the current measurements).  The fourth box will measure arrays of current and voltage (this function will not work on the N6900 APS units).      

I have posted this program on our Keysight Power Supply Forums at: Matt's Forum Post.  I have also opened a thread there where we can discuss this program.  It is still kind of preliminary so any feedback could possibly be incorporated into the program.  

That is all I have for this month.  Happy Halloween to all of our readers and please let me know any comments in the forum.


Thursday, October 30, 2014

What is a reverse protection diode and what does it do?

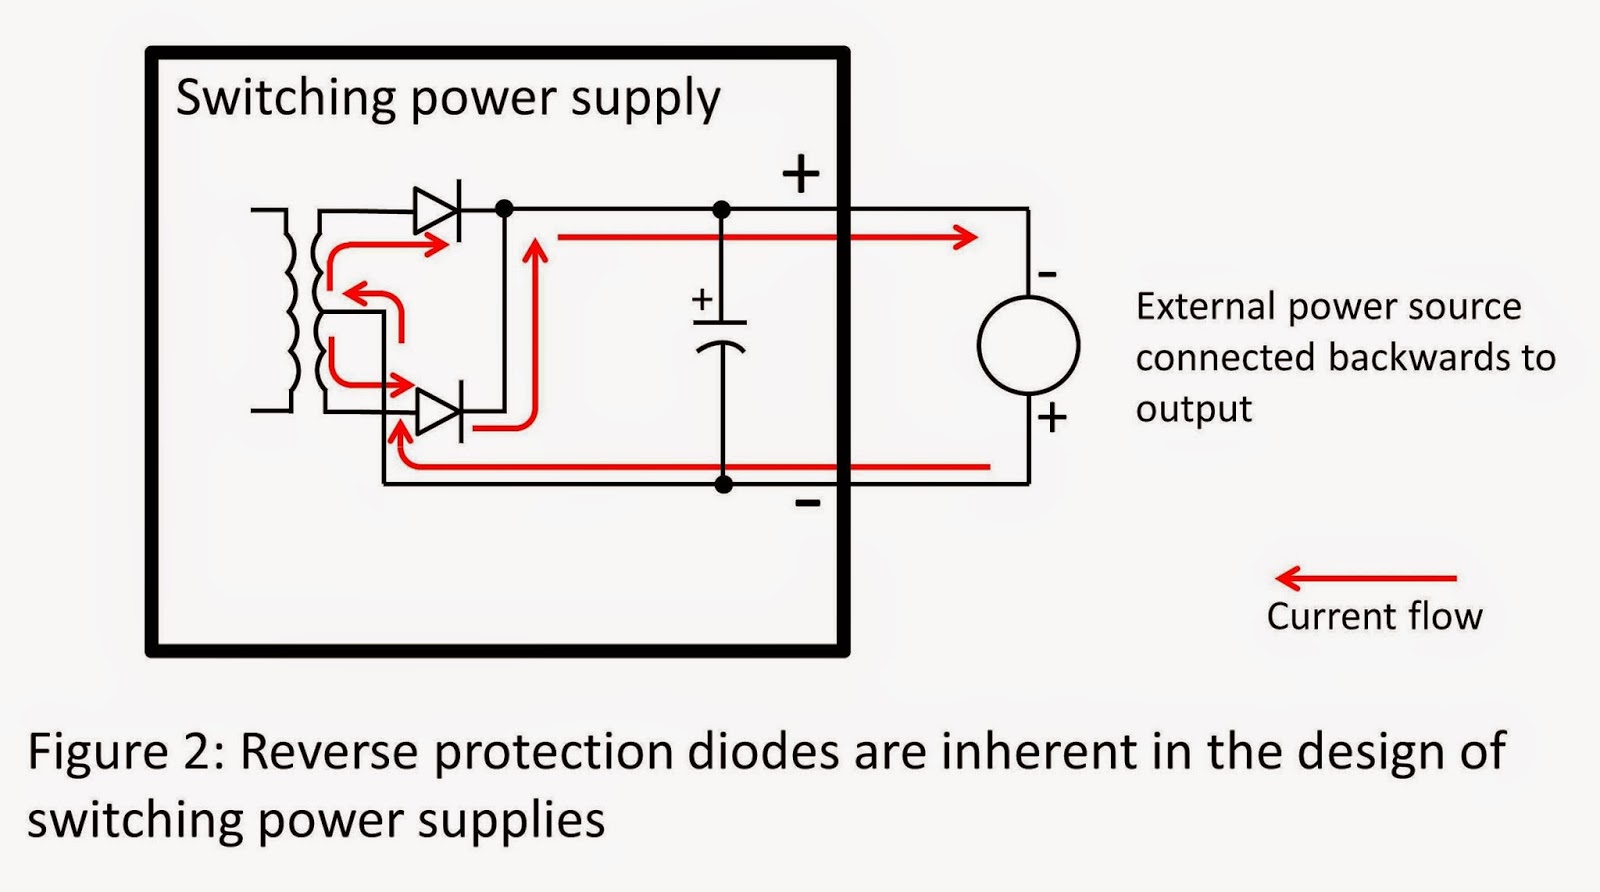
A reverse protection diode is used on the output of a power supply to protect the power supply from damage due to an externally applied reverse voltage. Most power supplies have a polarized electrolytic capacitor (or several) across the output terminals. These caps help to filter ripple and noise on the output and provide a charge reservoir to reduce voltage sags and surges due to large load current changes. Electrolytic caps can withstand some reverse voltage, but not much. About 1 V to 1.5 V is the most they will tolerate without venting or worse…exploding! The reverse protection diode limits the reverse voltage to a diode drop thereby protecting the output caps. The diode is typically rated for the full output current of the power supply it is protecting. Adding to the diode drop, there can be some more small voltage drops due to current flowing in wires, tracks, current monitor resistors, output filter inductors, switching transformer windings, etc.

In a linearly regulated power supply, the reverse protection diode must be added to the design with the cathode connected to the plus output and anode connected to the minus output. See Figure 1. In a switching power supply, the reverse protection diode(s) is (are) an inherent part of the design. See Figure 2.


But where does reverse voltage come from? During normal operation, reverse voltage does not occur on the output of a power supply (unless it is a bipolar power supply which does not use polarized caps on its output…see this post). The power supply internal circuitry typically cannot produce reverse voltage on the output even if a failure occurs inside the power supply. So a reverse voltage has to be applied from an external source of power. For example, if you use two power supply outputs in parallel and inadvertently connect them to each other backwards, a reverse voltage would result. Another possibility can occur when two power supply outputs are connected in series. If the load across the series combination shorts, the two power supply outputs will be connected to each other backwards. See Figures 3 and 4. The reverse protection diode of one of the power supplies will conduct all available current from the other power supply forcing it into constant current (CC) operation and limiting the voltage to a diode drop (plus any additional small drops mentioned above).


So rest assured that your Keysight power supply is protected against reverse voltage if something unexpected happens!

Wednesday, October 15, 2014

Creating a "bumping" auto-restarting over current protect on the N6900A/N7900A Advanced Power System

The two main features in system power supplies that have traditionally protected DUTs from too much current are the current limit and the over current protect (OCP). When a device, for any of a number of reasons, attempts to draw too much current, the current limit takes control of the power supply’s output, limiting the level of current to a safe level. An example of current limit taking control of a power supply output is shown in Figure 1.


Figure 1: Current limit protecting a DUT against excess current.

For those devices that cannot tolerate a sustained current at the current limit level, the over current protect can be set and activated to work with the current limit and shut down the power supply output after a specified delay time. This will protect a DUT against sustained current at the limit.  An example of an OCP shutting down a power supply output for greater protection against excess current is shown in Figure 2.


Figure 2: OCP protecting a DUT against excess current

We have talked about the current limit and OCP in previous posts. For more details on how the OCP works, it is worth reviewing “What is a power supply’s over current protect (OCP) and how does it work?” (Click here to review)

Sometimes it is desirable to have something that is in between the two extremes of current limit and OCP.  One middle-ground is a fold-back current limit, which cuts back on the current as the overload increases. More details about a fold-back current limit are described in a previous posting “Types of current limits for over-current protection on DC power supplies” (Click here to review). One thing about a fold-back current limit is the DUT and power supply will not be able to recover back into constant voltage (CV) operation unless the DUT is able to cut way back on its current demand.

Another type of current limit behavior that operates between regular current limit and OCP is one that shuts down the output, like OCP, but only temporarily. After a set period of time it will power up the output of the power supply again. If the DUT is still in overload, the power supply will shut down again. However, if the DUT’s overload condition has gone away, it will be able to restart under full power. In this way the DUT is protected against continuous current and at the same time it the power supply is not shut down and requiring intervention from an operator.

While this type of current limit is not normally a feature of a system DC power supply, it is possible to implement this functionality in the N6900A/N7900A Advanced Power System (APS) using its expression signal routing feature. This is a programmable logic system that is used to configure custom controls and triggers that run within the APS. Here the expression signal routing was used to create an auto-restarting current shutdown protect in the example shown in Figure 3.


Figure 3: Custom auto-restarting current shutdown protect configured for N6900A/N7900A APS

A custom control was created in the expression signal routing that triggers the output transient system to run if the current limit is exceeded for longer than 0.3 seconds. A list transient was programmed into the APS unit to have its output go to zero volts for 10 seconds and then return to the original voltage setting each time it is triggered. In this way the output would pulse back on for 0.3 seconds and then shut back down for another 10 seconds if the overload was not cleared. The custom trigger signal was graphically created and downloaded into the APS unit using the N7906A software utility, as shown in Figure 4.


Figure 4: Creating custom trigger for auto-restarting current shutdown protect on APS

Current limit and over current protect (OCP) are fairly standard in most all system DC power supplies for protecting your DUT against excess current. There are not a lot of other choices beyond this without resorting to custom hardware. One more option now available is to make use of programmable signal routing like that in the N6900A/N7900A APS. With a little ingenuity specialized controls like a auto-restarting current shutdown protect can be created through some simple programming.

Monday, October 6, 2014

Simulating battery contact bounce, part 2

In part 1 of this posting on simulating battery contact bounce (click here to review) I discussed what battery contact bounce is about and why creating a voltage dropout may not be adequate for simulating battery contact bounce. The first answer to addressing this was provided; use a blocking diode and then a voltage dropout is certain to be suitable for simulating battery contact bounce.

Another approach for simulating battery contact bounce is to add a solid state switch between the DC source and the battery powered device. While this is a good approach it is complex to implement. A suitable solid state switch needs to be selected along with coming up with an appropriate way to power and drive the input of the switch need to be developed.

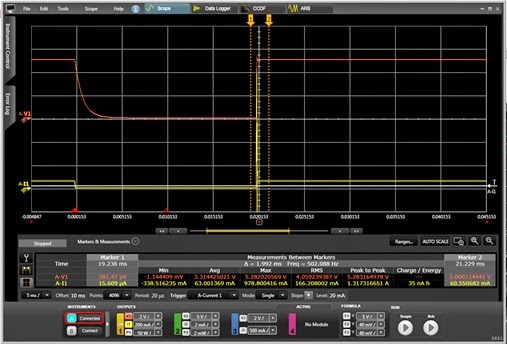
If for some reason using a blocking diode is not suitable, there is yet another fairly simple approach that can be taken to simulate high impedance battery contact bounce. Instead of programming a voltage dropout on the DC source, program a current dropout. Where the voltage going to zero during a voltage dropout is effectively a short circuit, as we saw in part 1, the current going to zero during a current dropout is effectively an open circuit. There are a couple of caveats for doing this. The main one is battery powered devices are powered from a battery, which is a voltage source, not a current source. In order for the DC source to act as a voltage source when delivering power, we need to rely on the DC source voltage limit being set to the level of the battery voltage. In order for this to happen we need to set the non-dropout current level to be in excess of the maximum level demanded by the device being powered and. Thus the DC source will normally be operating in voltage limit. Then when the current dropout drives the output current to zero, the DC source switches its operating mode from voltage limit to constant current, with a current value of zero. This operation is depicted in Figure 4, using a Keysight N6781A 2-quadrant SMU module designed for testing battery powered devices, operating within an N6705B DC Power Analyzer. In this example the current ARB for the dropout was both programmed and the results shown in Figure 1 captured using the companion 14585A software.


Figure 1: Current ARB creates a high impedance dropout to simulate battery contact bounce

Another caveat with using this approach for simulating battery contact bounce is paying careful attention to the behavior of the mode crossovers. For the first crossover, from voltage limit to constant current operation (at zero current) there is a small amount of lag time, typically just a fraction of a millisecond, before the transition happens. This becomes more significant only when trying to simulate extremely short contact bounce periods. More important is when crossing back over from constant zero current back to voltage limit operation. There is a short period when the current goes up to its high level before the voltage limit gains control, holding the voltage at the battery’s voltage level. Usually any capacitance at the input of the DUT will normally absorb any short spike of current. If this crossover is slow enough, and there is very little or no capacitance, the device could see a voltage spike. The N6781A has very fast responding circuits however, minimizing crossover time and inducing just 250 mV of overshoot, as is seen in Figure 1.

Hopefully, now armed with all of these details, you will be able to select an approach that works best for you for simulating battery contact bounce!