Showing posts with label APS. Show all posts

Tuesday, June 30, 2015

Using User Defined Statuses on the APS

Hi Everyone,

I wanted to talk about a feature in our Advanced Power Supply family (APS from here on out)  that not too many people know about.  The APS features two user defined statuses in the Operation Status group.  Here is a rundown of all the entries in the group:


You can see that bits 7 and 8 are User1 and User2.

Using the advanced triggering system for the APS you can define what conditions will trigger a change in these two statuses.  The N7906A Power Assistant Software (download link) has a very handy graphical way to set up the trigger.   As an example, let's say that I wanted to change the user defined status when the voltage exceeds 1 V and the unit goes into positive current limit status.  Using the Power Assistant Software I would whip up the following:


After I draw out my trigger expression, I can either download it to my APS or I can click the "SCPI to Clipboard" button on the top of the page.  If I hit that button now and then hit paste here, I get:

:SENSe:THReshold1:FUNCtion VOLTage
:SENSe:THReshold1:VOLTage 1
:SENSe:THReshold1:OPERation GT
:SYSTem:SIGNal:DEFine EXPRession1,"Thr1 AND CL+"
:STATus:OPERation:USER1:SOURce EXPRession1

I can just copy this code into my program.  It's a pretty convenient.

I think the big question is: What can you do with this?  The answer is: whatever you want.  It's user defined so you can use it in whatever way you see fit.  If you want to check if the current exceeds a certain threshold you don't want to do a bunch of measure commands in loop, you can define that as your trigger and then just check the Operation Status Group (using the STAT:OPER? or STAT:OPER:COND? queries). 

I think that the most powerful thing that you can do with this is set up a SRQ handler to act when the user statuses change.  This is actually a project that I am working on presently so I have not implemented this just yet (but I will in the near future).   When I do, I will definitely write a blog post about it though!  I wanted to get the word out about this because even I did not automatically think about this when faced with a issue that just screamed to use this.  

Thanks for reading and stay tuned for a future installment on this topic! 


Friday, May 22, 2015

New performance options for the N6900A Advance Power System gives greater versatility for your test needs

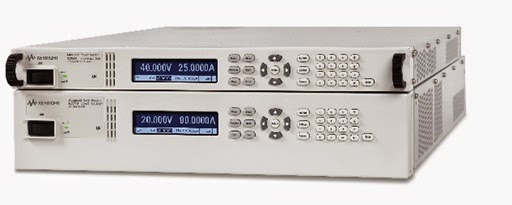
Our N6900 and N7900 series Advanced Power System (APS) DC power supplies are some of our most sophisticated products, setting new levels of performance and capabilities on many fronts. They come in 1kW and 2kW power levels as shown in Figure 1 and can be grouped together to provide much greater power levels as needed.


Figure 1: N6900 and N7900 Advanced Power System 1kW and 2kW models

Most noteworthy is that these can be turned into full two-quadrant DC sources by connecting up the optional 1kW N7909A Power Dissipator (2 needed for 2kW units) providing 100% power sinking capability. This makes APS an excellent solution for battery, battery management and many alternative energy applications, where both sourcing and sinking power are needed.
  • The N6900 series DC power supplies are designed for ATE applications where high test throughput and high performance is critical.
  • The N7900 series dynamic DC power supplies are designed for ATE applications where high speed dynamic sourcing and measurement is needed, in additions to high performance.

A lot more about these products is covered in another post on our General Purpose Electronic Test Equipment (GEPTE) blog when they were first announced. This is a great resource for learning more about APS and can be accessed from the following link: “New Advanced Power System: Designed to Overcome Your Toughest Test Challenges”

If you are a regular visitor to the “Watt’s Up?” blog no doubt you have seen we have shared a lot about how to do things with the N6900 series and N7900 series APS to address a number of difficult test challenges. A lot of times it would have otherwise required additional equipment or custom hardware to accomplish these tasks. While many of these examples are suitable for the N6900 and N7900, a good number of times examples make use of the additional capabilities only available in the N7900 series.

In certain test situations the N6900 series APS would be a great solution and lower cost than the N7900 series, if only it also had a certain additional capability. To this end Keysight has recently announced four new performance options for the N6900 series APS to address a specific test need you may have, as follows:
  1. Accuracy Package (option 301): Adds a second seamless measurement range for current
  2. Measurement Enhancements (Option 302): Adds external data logging and voltage and current digitizers with programmable sample rates
  3. Source and Speed Enhancements (Option 303): Adds constant dwell arbitrary waveforms and output list capability, and faster up and down programming speed
  4. Disconnect and Polarity-Reversal Relays (Option 760 and 761): Provides galvanic isolation and allows output voltage to be switched between positive and negative values

 Additional details about the N6900 series APS and the four new performance options are available from the recent press release, available at the following link: “Keysight Technologies adds Versatile Performance Options to Industry’s Fastest Power Supplies”

With these new options you now have a spectrum of choices in the Advanced Power System product family to better address any test challenges you may be faced with!

Thursday, April 30, 2015

Let's See the Watchdog TImer in Action

Hi everybody!

It is the end of the month and time for my monthly blog post.

Quite some time ago, my buddy Gary mentioned our watchdog timer protection in a post.  Here is what he had to say:

The watchdog timer is a unique feature on some Agilent power supplies, such as the N6700 series. This feature looks for any interface bus activity (LAN, GPIB, or USB) and if no bus activity is detected by the power supply for a time that you set, the power supply output shuts down. This feature was inspired by one of our customers testing new chip designs. The engineer was running long-term reliability testing including heating and cooling of the chips. These tests would run for weeks or even months. A computer program was used to control the N6700 power supplies that were responsible for heating and cooling the chips. If the program hung up, it was possible to burn up the chips. So the engineer expressed an interest in having the power supply shut down its own outputs if no commands were received by the power supply for a length of time indicating that the program has stopped working properly. The watchdog timer allows you to set delay times from 1 to 3600 seconds. 

(For the whole post click here)

Since Gary wrote that post, we have released the N6900 and N7900 APS units that also include this useful feature.  What I wanted to do was show how to set it up, how to use it,and how to clear it so that everything is a bit more clear.   All of my programming examples in this post will be done using my APS with the VISA-COM IO Library in Visual Basic.

The setup is pretty easy:

        APS.WriteString("OUTP:PROT:WDOG:DEL 5")
        APS.WriteString("OUTP:PROT:WDOG ON")

This sets the watchdog delay to 5 seconds and enables it.  This means that if there is no IO activity (ie your computer hangs up) for 5 seconds, then the unit will go into protect and shut the output down.

Lets say that I have a program that performs a measurement around every second for a minute.  Here is the program:


        APS.WriteString("OUTP:PROT:WDOG:DEL 2")
        APS.WriteString("OUTP:PROT:WDOG ON")

        For i = 0 To 59
            APS.WriteString("MEAS:VOLT?")
            strResponse = APS.ReadString
            Threading.Thread.Sleep(1000)
        Next

        Threading.Thread.Sleep(3000)

        APS.WriteString("STAT:QUES:COND?")
        strResponse = APS.ReadString

 The watchdog delay is set for 2 second so while I run in the loop taking my measurements everything is working great.  After the 3 second wait at the end though, the 2 second watchdog timer comes into effect and the unit goes into the protect state and disables the output.  The response to the questionsable status query is 2048 which corresponds to bit 11 of the register which is defined as "Output is disabled by a watchdog timer protection".  This is the expected result.

My reccomendation to clear the watchdog timer would be to first disable the watchdog timer and then clear the protect.  You can then re-start the watchdog timer when you are ready.

        APS.WriteString("OUTP:PROT:WDOG OFF")
        APS.WriteString("OUTP:PROT:CLE")

The watchdog timer is a pretty cool feature that can perform a pretty useful task.  I hope that this blog post explains what it is and how to use it a bit more.

Tuesday, April 28, 2015

Optimizing a Power Supply’s Output Response Speed for Applications Demanding Higher Performance

Most basic performance power supplies are intended for just providing DC power and maintain a stable output for a wide range of load conditions. They often have lower output bandwidth to achieve this, with the following consequences:
  • Internally this means the feedback loop gain rolls off to zero at a lower frequency, providing relatively greater phase margin. Greater phase margin allows the power supply to remain stable for a wider range of loads, especially larger capacitive loads, when operating as a voltage source.
  • Externally this means the output moves slower; both when programming the output to a new voltage setting as well as when recovering from a step change in output load current.


While this is reasonably suited for fairly static DC powering requirements, greater dynamic output performance is often desirable for a number of more demanding applications, such as:
  • High throughput testing where the power supply’s output needs to change values quickly
  • Fast-slewing pulsed current loads where the transient voltage drop needs to be minimized
  • Applications where the power supply is used to generate power ARB waveforms


A number of things need to be done to a power supply so that it will have faster, higher performance output response speed. Primarily however, this is done by increasing its bandwidth, which means increasing its loop gain and pushing the loop gain crossover out to a higher frequency. The consequence of this the power supply’s stability can be more influenced by the load, especially larger capacitive loads.

To better accommodate a wide range of different loads many of our higher performance power supplies feature a programmable bandwidth or programmable output compensation controls. This allows the output to be set for higher output response speed for a given load, while maintaining stable operation at the same time. As one example our N7900A series Advanced Power System (APS) has a programmable output bandwidth control that can be set to Low, for maximum stability, or set to High1, for much greater output voltage response speed. This can be seen in the graph in Figure 1, taken from the APS user’s guide.


Figure 1: N7900A APS small signal resistive loading output voltage response

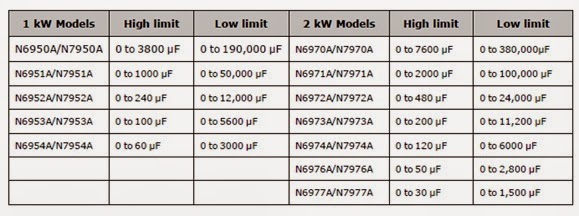
Low setting provides maximum stability and so it accommodates a wider range of capacitive loading. High 1 setting in comparison is stable for a smaller range of capacitive loading, but allowing greater response bandwidth. This can be seen in table 1 below, for the recommended capacitive loading for the N7900A APS, again taken from the APS user’s guide.


Table 1: N7900A APS recommended maximum capacitive loading

While a maximum capacitive value is shown for each of the different APS models for each of the two settings, this is not altogether as rigid and fixed as it may appear. What is not so obvious is this is based on the load remaining capacitive over a frequency range roughly comparable to the power supply’s response bandwidth or beyond. Because of this the capacitor’s ESR (equivalent series resistance) is an important factor. Beyond the corner frequency determined by the capacitor’s capacitance and ESR, the capacitor looks resistive. If this frequency is considerably lower than the power supply’s response bandwidth, then it has little to no effect on the power supply’s stability. This is the reason why the power supply is able to charge and discharge a super capacitor, even though its value is far greater than the capacitance limit given, and not run into stability problems, for example.

One last consideration for more demanding applications needing fast dynamic output changes, either when changing values or generating ARBs is the current needed for charging and discharging capacitive loads.  Capacitors increasingly become “short-circuits” to higher AC frequencies, requiring the power supply to be able to drive or sink very large currents in order to remain effective as a dynamic voltage source!

.

Saturday, February 28, 2015

Synchronize Your Measurements with Your List Transients

Hi everybody!

My blog post this month is the result of a recent customer question.  The question was: how do you synchronize measurements with list transients?  The short answer is that you use the built in digitizer to generate enough points to sample the measurements over the entire transient.  The rest of this blog will provide the long answer.  The program that I am using here was written for a N6762A DC Power Module but the technique will work with any power supply that has a built in digitizer such as the Advanced Power System or any N6700 module with option 054.

For simplicity’s sake, we are going to use a 5 point list.  The voltage steps are 1 V, 2 V, 3 V, 4 V, and 5 V and the dwell times are 0.1 s, 0.2 s, 0.3 s, 0.4 s, and 0.5 s.  Let’s first set the list up (please note that all programming is done in VB.net with VISA-COM):


The next thing to do is to set up the measurement system.  We need to figure out the total number of points that we need measure so that we can cover the entire transient.  The first thing that we need to do is to calculate the total time of the list transient (you can even do this in your program):


The total time of our transient is 1.5 s.  Now we need to use this to figure out the number of points. I am going to choose a measurement interval of 40.96 us.  This means that we want to take a measurement every 40.96 us for 15 s.  To get the total number of points, you need to divide the total transient time by the measurement time interval:

I’m going to round down and use 36,621 points.  I’m also going to tell the power supply to use the binary data format because as we know from my previous blog posts, this is the fastest way to read back data.   Here is the code to set up the digitizer:


We will set our trigger source to bus for both the transient system and the acquire system:


Next we initiate both systems:


Once the initiate is complete, we send a trigger:

This will start both the list transient and the digitizer.  After everything is completed, we can fetch our measured voltage array:


This array will have all of our measurements.

I hope that this has been useful, have a good month everyone.


Friday, December 12, 2014

Why Does Over Current Protect (OCP) have a Programmable Delay Value in the First Place?

Since I am on a roll about over current protect (OCP), having just completed a two-part posting “Why does the response time of OCP vary on the power supply I am using and what can I do about it?” (Review part 1) (Review part 2) there is yet another aspect about OCP that is worth bringing up at this time. And that is “why does OCP have a programmable delay value in the first place?” This actually came up in a discussion with a colleague here after having read my part posting.

It may seem a bit ironic that OCP has a programmable delay in that in my posting on OCP I shared ideas on how one can minimize the response time delay encountered. But this is not contradictory. One may very well want to minimize it, eliminating extra delay being encountered, but not necessarily eliminate it altogether. As can be seen in my previous postings, I had programmed the OCP delay time to 5 ms.

The programmable OCP delay does serve a purpose, and that is to prevent false OCP trips. Adding some delay time prevents these false trips.  For someone who knows the root cause of false OCP tripping they might be half right. There are actually been two main causes of false OCP trips which are prevented by adding some delay time.

The original problem with OCP was that it would be falsely tripped when output voltage settings were changed on the power supply, due to capacitive loading at the test fixture or within the DUT. This is especially prominent with inrush current when first bringing up the voltage to power the DUT. An OCP delay prevents false triggering under these conditions. To correct the false tripping the delay would be invoked when output programming changes were made. As one example, the OCP delay description in our manual for our 663x series power supplies states:

This command sets the time between the programming of an output change that produces a constant
current condition (CC) and the recording of that condition by the Operation Status Condition register. The
delay prevents the momentary changes in status that can occur during reprogramming from being
registered as events by the status subsystem. Since the constant current condition is used to trigger
overcurrent protection (OCP), this command also delays OCP.”

Under this situation the momentary overcurrent is induced by the power supply. Although not nearly as much as in issue in practice, momentary overcurrents can also be DUT-induced as well. This is the second situation that can cause a false tripping of the OCP. The DUT may be independently turned on after the bias voltage has already been on and draw a surge of current. Or the DUT may change mode of operation and draw a temporary surge of current.  If the OCP delay is invoked only by an output programming change it does not have any effect in these situations.

On later generation products, such as our N6700, N6900, and N7900 series, the user also has the ability to programmatically select between having the OCP delay activate from either an output change, or from going into CC condition. This gives the user a way to remain consistent with original operation or have OCP delay effective for momentary DUT-induced overload currents as well!


Friday, December 5, 2014

Why does the response time of OCP vary on the power supply I am using and what can I do about it? Part 2

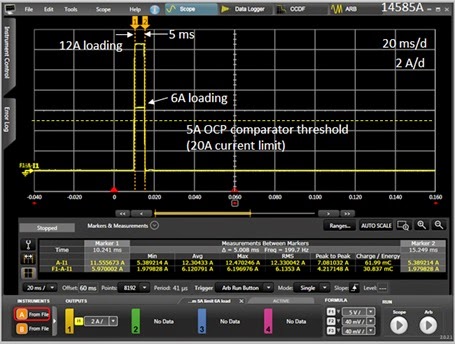
In the first part of this posting (click here to review) I highlighted what kind of response time is important for effective over current protection of typical DUTs and what the actual response characteristic is for a typical over current protect (OCP) system in a test system DC power supply. For reference I am including the example of OCP response time from the first part again, shown in Figure 1.


Figure 1: Example OCP system response time vs. overdrive level

Here in Figure 1 the response time of the OCP system of a Keysight N7951A 20V, 50A power supply was characterized using the companion 14585A software. It compares response times of 6A and 12A loading when the current limit is set to 5A. Including the programmed OCP delay time of 5 milliseconds it was found that the actual total response time was 7 milliseconds for 12A loading and 113 milliseconds for 6A loading.  As can be seen, for reasons previously explained, the response time clearly depends on the amount of overdrive beyond the current limit setting.

As the time to cause over current damage depends on the amount of current in excess of what the DUT can tolerate, with greater current causing damage more quickly, the slower response at lower overloads is generally not an issue.  If however you are still looking how you might further improve on OCP response speed for more effective protection, there are some things that you can do.

The first thing that can be done is to avoid using a power supply that has a full output current rating that is far greater than what the DUT actually draws. In this way the overdrive from an overload will be a greater percentage of the full output current rating. This will normally cause the current limit circuit to respond more quickly.

A second thing that can be done is to evaluate different models of power supplies to determine how quickly their various current limit circuits and OCP systems respond in based on your desired needs for protecting your DUT. For various reasons different models of power supplies will have different response times. As previously discussed in my first part, the slow response at low levels of overdrive is determined by the response of the current limit circuit.

One more alternative that can provide exceptionally fast response time is to have an OCP system that operates independently of a current limit circuit, much like how an over voltage protect (OVP) system works. Here the output level is simply compared against the protect level and, once exceeded, the power supply output is shut down to provide near-instantaneous protection. The problem here is this is not available on virtually any DC power supplies and would normally require building custom hardware that senses the fault condition and locally disconnects the output of the power supply from the DUT. However, one instance where it is possible to provide this kind of near-instantaneous over current protection is through the programmable signal routing system (i.e. programmable trigger system) in the Keysight N6900A and N7900A Advanced Power System (APS) DC power supplies. Configuring this triggering is illustrated in Figure 2.


Figure 2: Configuring a fast-acting OCP for the N6900A/N7900A Advanced Power System

In Figure 2 the N7909A software utility was used to graphically configure and download a fast-acting OCP level trigger into an N7951A Advanced Power System. Although this trigger is software defined it runs locally within the N7951A’s firmware at hardware speeds. The N7909A SW utility also generates the SCPI command set which can be incorporated into a test program.


Figure 3: Example custom-configured OCP system response time vs. overdrive level

Figure 3 captures the performance of this custom-configured OCP system running within the N7951A. As the OCP threshold and overdrive levels are the same this can be directly compared to the performance shown in Figure 1, using the conventional, current limit based OCP within the N7951A. A 5 millisecond OCP delay was included, as before. However, unlike before, there is now virtually no extra delay due to a current limit control circuit as the custom-configured OCP system is totally independent of it. Also, unlike before, it can now be seen the same fast response is achieved regardless of having just a small amount or a large amount of overdrive.

Because OCP systems rely on being initiated from the current limit control circuit, the OCP response time also includes the current limit response time. For most all over current protection needs this is usually plenty adequate.  If a faster-responding OCP is called for minimizing the size of the power supply and evaluating the performance of the OCP is beneficial. However, an OCP that operates independently of the current limit will ultimately be far faster responding, such as that which can be achieved either with custom hardware or making use of a programmable signal routing and triggering system like that found in the Keysight N6900A and N7900A Advanced Power Systems.

Tuesday, November 18, 2014

Why does the response time of OCP vary on the power supply I am using and what can I do about it? Part 1

In a previous posting of mine “Providing effective protection of your DUT against over voltage damage during test”(click here to review), an important consideration for effective protection was to factor in the response time of the over voltage protect (OVP) system. Due to the nature of over voltage damage, the OVP must be reasonably fast. The response time can typically be just a few tens of microseconds for a reasonably fast OVP system on a higher performance system power supply to hundreds of microseconds on a more basic performance system power supply. This response time usually does not vary greatly with the amount of over voltage being experienced.

Just as with voltage, system power supplies usually incorporate over current protect (OCP) systems as well. But unlike over voltage damage, which is almost instantaneous once that threshold is reached, over current takes more time to cause damage. It also varies in some proportion to the current level; lower currents taking a lot longer to cause damage. The I2t rating of an electrical fuse is one example that illustrates this effect.

Correspondingly, like OVP, power supply OCP systems also have a response time. And also like OVP, the test engineer needs to take this response time into consideration for effective protection of the DUT.  However, unlike OVP, the response time of an OCP system is quite a bit different. The response time of an OCP system is illustrated in Figure 1.


Figure 1: Example OCP system response time vs. overdrive level

Here in Figure 1 the response time of the OCP system of a Keysight N7951A 20V, 50A power supply was characterized using the companion 14585A software. It compares response times of 6A and 12A loading when the current limit is set to 5A. Including the programmed OCP delay time of 5 milliseconds it was found that the actual total response time was 7 milliseconds for 12A loading and 113 milliseconds for 6A loading.

This is quite different than the response time of an OVP system. Even if the OCP delay time was set to zero, the response is still on the order of milliseconds instead of microseconds for the OVP system. And when the amount of overdrive is small, as is the case for the 6A loading, providing just 1A of overdrive, the total response time is much greater. Why is that?

Unlike the OVP system, which operates totally independent of the voltage limit control system, the OCP system is triggered off the current limit control system. Thus the total response time includes the response time of the current limit as well. The behavior of a current limit is quite different than a simple “go/no go” threshold detector as well. A limit system, or circuit, needs to regulate the power supply’s output at a certain level, making it a feedback control system. Because of this stability of this system is important, both with crossing over from constant voltage operation as well as maintaining a stable output current after crossing over. This leads to the slower and overdrive dependent response characteristics that are typical of current limit systems.

So what can be done about the slower response of an OCP system? Well, early on in this posting I talked about the nature of over current damage. Generally over current damage is much slower by nature and the over drive dependent response time is in keeping with time dependent nature of over current damage. The important thing is understand what the OCP response characteristic is like and what amount of over current your DUT is able to sustain, and you should be able to make effective use of the over current protection capabilities of your system power supply.

If however you are still looking how you might further improve on OCP response speed, look for my follow up to this in my next posting!

Friday, October 31, 2014

APS Paralleling Made Easier through Programming

Hi Everyone,

The Advanced Power Supply family has a very slick way to parallel units for higher current called current sharing.  This enables all of the paralleled units to be in Constant Voltage (CV) mode which is a change from most of our other power supplies that have one unit in CV mode and the rest of the units in Constant Current (CC) mode.  My colleague Ed did a very informative blog post about the different paralleling options that explains a bit more about paralleling units so I will not rehash any of that here.  Here is a link to that post: Paralleling Power Supplies.

The main drawback of the paralleling on the APS is that it can be a little difficult to get everything properly set to get the best performance.  You need to synchronize your current measurements and your voltage transients.  If you look in the manual, there are quite a few pages explaining how to set this all up.  I am happy to say that we have made this a little easier.  Our summer intern spent some time writing a VBA program in Excel that automatically does much of this.  The program uses Keysight VISA-COM so you need to have the Keysight IO Libraries installed to use it.  It will work with LAN, GPIB, and USB (all of which come standard on all APS units).

The first thing that we need to do is talk about the setup.  There are quite a few wire connections that need to be made.

First you need to connect the current sharing ports, the sense connections, and the outputs to the load:

After that, you also need to make some connections on the 8 pin  digital connector on the back of the APS units. You do not need to worry about setting up the pins if you plan on using the default pin assignments from the program.  The default pin assignments are:

Pin 6 on all units - On Couple
Pin 7 on all units - Off Couple
Pin 1 on the master unit - Trigger Out
Pin 1 on all other units - Trigger In
Pin 8 on all units - common

Here is a wiring diagram of the default assignments (for 3 units):


The On/Off Couple Pins make it so that when you enable or disable the output on any unit, all of the units enable or disable. The trigger line enable us to synchronize measurements as well as voltage changes.  

The Interface looks something like this:

It is divided into four boxes.  I will refer to them as boxes 1 to 4 with 1 being the left most box.  Box 1 is where you enter the VISA initialization string for each paralleled supply.  You can get this from the Keysight IO Libraries.  Box 2 is where you enter your settings  You can set the voltage limit, positive and negative current limit, change the output state, and change the voltage.  Most importantly, this is where you set the number of paralleled units.  This needs to be done or else the program will not work correctly.  You can parallel 1 kW and 2 kW units with each other, as long as they have the same maximum voltage so we also need to break out the number of 2 kW units in the scheme.  The third box will do a scalar measurement of the voltage and current.  This will report the total current of the paralleled units (it does a triggered measurement and adds all of the current measurements).  The fourth box will measure arrays of current and voltage (this function will not work on the N6900 APS units).      

I have posted this program on our Keysight Power Supply Forums at: Matt's Forum Post.  I have also opened a thread there where we can discuss this program.  It is still kind of preliminary so any feedback could possibly be incorporated into the program.  

That is all I have for this month.  Happy Halloween to all of our readers and please let me know any comments in the forum.


Wednesday, September 10, 2014

How do I protect my DUT against my power supply sense lines becoming disconnected, misconnected, or shorted?

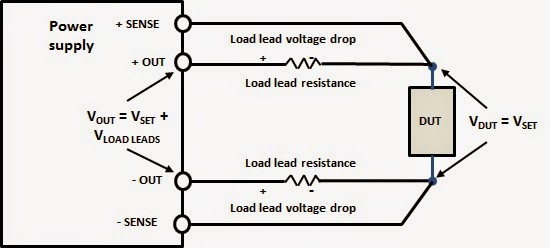
The remote sense lines are a vital part of any good system power supply. As shown in Figure 1, by using a second, separate pair of leads for sensing, the output voltage is now regulated right at the DUT rather than at the output terminals on the power supply. Any voltage drops in the force leads are compensated for; assuring the highest possible voltage accuracy is achieved right at the DUT.


Figure 1: Remotely sensing and regulating output voltage at the DUT

Of course for this to work correctly the sense leads need to have a good connection at the DUT. However, what if the sense leads become disconnected, misconnected, or shorted?

One might think if one or both of the sense leads became disconnected, the sensed voltage would then become zero, causing the output voltage on the force leads to climb up out of control until the over voltage protect (OVP) trips. This turns out not to be the case, as a co-contributor here, Gary had pointed out in a previous posting “What happens if remote sense leads open?” (Click here to review). Basically a passive protection mechanism called sense protect maintains a backup connection between the sense line and corresponding output terminal inside the power supply in the event of a sense line becoming disconnected.

While sense protect is an indispensable feature to help protect your DUT by preventing runaway over-voltage, if a sense lead is open the voltage at your DUT is still not as accurate as it should be due to uncompensated voltage drops in the force leads. This can lead to miscalibrated DUTs and you would not even know that it is happening. To address this some system power supplies include an active open sense lead fault detection system. As one example our 663xx Mobile Communications DC Sources check the sense lead connections during each output enable and will issue a fault protect and shut down the output if one or both sense leads become disconnected. It will also let you know which of the sense leads are disconnected. It can be enabled and disabled as needed. I had written about this in a previous posting “Open sense lead detection, additional protection for remote voltage sensing” (Click here to review).

Taking sense protection further, we have incorporated a system we refer to as sense fault detect (SFD) in our N6900A and N7900A Advanced Power System (APS). It can be enabled or disabled. When enabled it continually monitors the sense lead connections at all times. If it detects a sense fault it sets a corresponding bit in the questionable status group register as well as turn on status annunciator on the front panel to alert the user, but does not disable the output. Through the expression signal routing system a “smart trigger” can be configured as shown in Figure 2 to provide a protect shutdown on the event of a sense fault detection.  In all, sense fault detect on APS provides a higher level of protection and flexibility.


Figure 2: Configuring a custom opens sense fault protect on the N6900/N7900 APS

What happens if the sense leads become shorted? Unlike open sense leads, in this case the output voltage can rise uncontrolled. The safeguard for this relies on the over voltage protect system. The same thing happens if the sense leads are reversed. The power supply will think the output voltage is too low and keep increasing the output voltage in an attempt to correct it. Again the safeguard for this relies on the over voltage protect system. The N6900/N7900 APS does actually distinguish the difference when the sense leads are reversed by generating a negative OVP (OV-) fault, giving the user more insight on what the fault is to better help in rectifying the problem.

Remote voltage sensing provides a great benefit by being able to accurately control the voltage right at the DUT. Along with the appropriate safeguards against sense lead misconnections you get all the benefit without any of the corresponding risks!

Remote sense protect and sense fault detect were just two of many topics about in my seminar “Protect your device against power related damage during test” I gave last month. As it was recorded it is available on demand if you have interest in learning more about this topic. You can access the sign up from the following link: (Click here for description and to register)

Monday, July 14, 2014

Extending the usable bandwidth of the DC source when performing AC disturbance testing on your DUT

A lot of various products that run off of DC power, often destined to be used in automobiles and other types of vehicles, but even quite a number in stationary applications as well, require validation testing for impact of having AC disturbances riding on top the DC powering them.

 Conducting this type of testing is often a big challenge for the test engineer in finding a solution that adequately addresses the disturbance test requirements. It usually requires multiple pieces of hardware:
  • A DC power supply is used to provide the DC bias voltage and power.
  • A power amplifier is used to generate the AC disturbance.
  • A separate ARB /function generator is needed to produce the reference signal for the disturbance

Coupling the DC power supply and power amplifier together is extremely problematic. While it would be great to just directly connect the two in series, this rarely can be done in practice as the power amplifier usually cannot handle the DC current of the power supply. A variety of custom approaches are then typically taken, all with their associated drawbacks.

An article about this very topic was published last year, written by a colleague I work with, Paul Young in our R&D group. As he noted it’s great when the power source can provide both the DC power as well as the AC disturbance as this is a big savings over trying to incorporate multiple pieces of equipment. Paul’s article “Extending the Usable Bandwidth of a Programmable Power Supply for Generating Sinusoidal Waveforms” (click here to review) is an excellent reference on this and the inspiration for my blog posting this week.

Our N6705B DC Power Analyzer in Figure 1 and recently introduced N7900A series Advanced Power System (APS) 1KW and 2KW power supplies in Figure 2 have proven to be very useful for doing a variety of testing where transients and audio disturbances are needing to be introduced on top of the DC that is powering the DUT.


Figure 1: Agilent N6705B DC Power Analyzer and N6700 series DC power modules


Figure 2: Agilent N7900A series 1KW and 2KW Advanced Power System and N7909A Power Dissipator

The reasons for these products being useful for disturbance testing are due to their built in ARB generation capability in conjunction with having a respectable AC bandwidth, on top of being able to source the DC power. Everything can be done within one piece of equipment.

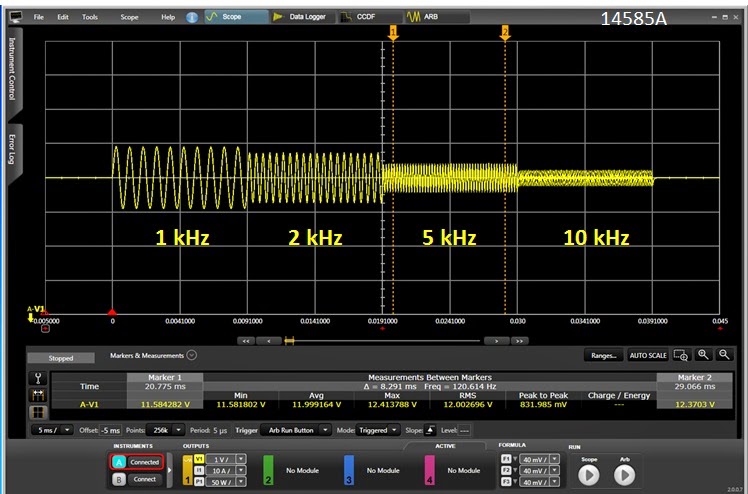
A very common test need is to superimpose a sinusoidal disturbance in the audio range. One example of this is in automobiles. The alternator “whine” AC ripple induced on top of the DC output falls within this category. Our 1KW and 2KW N7900A series APS are good for applications needing higher DC power. However, at first glance the specified AC bandwidth of 2 kHz on does not look like it would work well for higher audio frequencies. The AC response of an N7951A from 1 kHz to 10 kHz is shown in Figure 3. This was captured using the 14585A companion software to set up its ARB.  There is noticeable roll off for higher frequency, as expected.


Figure 3: N7951A APS AC response characteristics captured using companion 14585A software

However, it’s worth noting that the roll off is gradual and very predictable. In the case of superimposing a relatively small AC signal on top of the DC output it is easy to compensate by measuring the attenuation at the given frequency and applying a gain factor to correct for it, as I did as shown in Figure 4. As one example, for 5 kHz, I programmed 2.38 volts peak to get the desired 1 volt peak.


Figure 4: N7951A APS AC response characteristics after gain correction

As can be seen it was simple to now get a flat response over the entire range. A limiting factor here is sum of the programmed DC value plus programmed AC peak value needs to be within the voltage programming range of the power supply being used. In practice, when the AC disturbance is reasonably small it is easy to cover a wide range of frequency.

Another factor to consider is capacitive loading. Some DC powered products sometimes have a fairly substantial filter capacitor built in across the DC power input. This will increase the peak current drain from the power supply when AC is applied on top of the DC. As an example a 100 microfarad capacitor will draw a peak current of 6.28 amps when a 10 kHz, 1 volt peak AC signal is applied. There may also be series impedance limiting the peak current, but whatever this AC peak current is it needs to be included when determining the size of the power supply needed.

With these basic considerations you will be able to perform AC disturbance testing over a much greater bandwidth as well!

.

Monday, June 23, 2014

Safeguarding your power-sensitive DUTs from an over power condition

Today’s system DC power supplies incorporate quite a variety of features to protect both the device under test (DUT) as well as the power supply itself from damage due to a fault condition or setting mishap. Over voltage protect (OVP) and over current protect (OCP) are two core protection features that are found on most all system DC power supplies to help protect against power-related damage.

OVP helps assure the DUT is protected against power-related damage in the event voltage rises above an acceptable range of operation. As over voltage damage is almost instantaneous the OVP level is set at reasonable margin below this level to be effective, yet is suitably higher than maximum expected DUT operating voltage so that any transient voltages do not cause false tripping. Causes of OV conditions are often external to the DUT.

OCP helps assure the DUT is protected against power-related damage in the event it fails in some fashion causing excess current, such as an internal short or some other type of failure. The DUT can also draw excess current from consuming excess power due to overloading or internal problem causing inefficient operation and excessive internal power dissipation.

OVP and OCP are depicted in Figure 1 below for an example DUT that operates at a set voltage level of 48V, within a few percent, and uses about 450W of power. In this case the OVP and OCP levels are set at about 10% higher to safeguard the DUT.


Figure 1: OVP and OCP settings to safeguard an example DUT

However, not all DUTs operate over as limited a range as depicted in Figure 1. Consider for example many, if not most all DC to DC converters operate over a wide range of voltage while using relatively constant power. Similarly many devices incorporate DC to DC converters to give them an extended range of input voltage operation. To illustrate with an example, consider a DC to DC converter that operates from 24 to 48 volts and runs at 225W is shown in Figure 2. DC to DC converters operate very efficiency so they dissipate a small amount of power and the rest is transferred to the load. If there is a problem with the DC to DC converter causing it to run inefficiently it could be quickly damaged due to overheating. While the fixed OCP level depicted here will also adequately protect it for over power at 24 volts, as can be seen it does not work well to protect the DUT for over power at higher voltage levels.


Figure 2: Example DC to DC converter input V and I operating range

A preferable alternative would instead be to have an over power protection limit, as depicted in Figure 3. This would provide an adequate safeguard regardless of input voltage setting.


Figure 3: Example DC to DC converter input V and I operating range with over power protect

As an over power level setting is not a feature that is commonly found in system DC power supplies, this would then mean having to change the OCP level for each voltage setting change, which may not be convenient or desirable, or in some cases practical to do. However, in the Agilent N6900A and N7900A Advance Power System DC power supplies it is possible to continually sense the output power level in the configurable smart triggering system. This can in turn be used to create a logical expression to use the output power level to trigger an output protect shutdown. This is depicted in Figure 4, using the N7906A software utility to graphically configure this logical expression and then download it into the Advance Power System DC power supply. As the smart triggering system operates at hardware speeds within the instrument it is fast-responding, an important consideration for implementing protection mechanisms.


Figure 4: N7906A Software utility graphically configuring an over power protect shutdown

A glitch delay was also added to prevent false triggers due to temporary peaks of power being drawn by the DUT during transient events. While the output power level is being used here to trigger a fault shutdown it could have been just as easily used to trigger a variety of other actions as well.

Wednesday, April 30, 2014

New Software Update for the N7900 Advanced Power System

Hi everybody,

Last year, we introduced the Agilent N7900 Advanced Power System (hereon in shortened to N7900 APS).  The N7900 APS is a full of great features that can only be accessed using the instrument's programming interface.  The programming interface works very well but sometimes you just don't want write and troubleshoot a program, you just want something that works.

Well, I have the chance to share some pretty exciting news.  We want to provide you software that makes some of these great features easy for you to use.  The software is the 14585A Control and Analysis Software.  This software was previously only available for the N6705 DC Power Analyzer.

The 14585A software is a standalone application that unlocks three key features: it allows you to look at a graphical representation of the measured data in Scope Mode, create arbitrary waveforms in Arb mode, and log long term data in datalogger mode.  These three advanced features can be setup and run by adjusting a few settings and pressing a few buttons.

 The software comes with a 30 day free trial so feel free to download it to check it out.  Please note that you need at least version A.01.13 of the APS firmware in order to use the software.

You can find the latest APS firmware at:
APS Firmware

You can find the software at:
14585A Software

If you have any questions on the software, feel free to leave us some comments.  Thanks for reading!

Wednesday, January 29, 2014

Using a DC Power Supply to Regulate Energy

In a previous 2-part posting I talked about what power and energy is (part 1 – energy) (part 2 – power).  It is pretty straight-forward thing to do to use a DC power supply for regulating voltage or current. Constant voltage (CV) and constant current (CC) regulation are standard features of most all DC power supplies used in testing. However, what if you have an unusual application calling for applying a fixed amount of energy to your device under test (DUT)? For example, adding a fixed amount of energy to a calorimeter or chemical process, or testing the must (or must not) tripping energy of a fuse, or circuit breaker, or squib or detonator perhaps?

When the resistance of a device remains constant, it is relatively straight-forward to apply a fixed amount of energy to a DUT. By applying a fixed voltage or current, the power in the DUT remains constant. Then the energy is simply:

E = (V2/R)*t = (I2*R)*t

Where E is the energy in watt-seconds or joules, V is voltage in volts, R is resistance in ohms, I is the current in amps, and t is time in seconds. All you now need to do is apply the constant voltage or current for a pre-determined amount of time and you will then be delivering a fixed amount of energy to your DUT.

Many times however, a lot of DUTs do not maintain constant loading. The may have a dynamically varying loading by nature or its resistance dramatically increases as it heats up. How do you regulate a fixed amount of energy to your DUT under these circumstances? One possibility is to use one of a few specialized power supplies on the market can regulate their outputs with constant power. As the DUT’s loading decreases or increases the power supply will adjust its output accordingly in order to maintain a constant output power delivered to the DUT.  Again then, by applying this constant power for a pre-determined amount of time you will then be delivering a fixed amount of energy to your DUT.

Still, for DUTs that do not maintain constant loading, it is very often not desirable, or outright unacceptable, to apply constant power sourcing.. It may be you can only apply a fixed voltage or current to your DUT. What can you do for these circumstances? Time can no longer remain a fixed value when trying to regulate a fixed amount of energy. The solution becomes quite a bit more complex, as depicted in Figure 1.


Figure 1: Regulating a fixed amount of energy to a DUT

Putting the solution depicted in Figure 1 into practice can prove challenging. The watt-hour meter needs to provide a trigger out signal when the desired watt-hour (or watt-second) threshold level is reached. This becomes even more challenging if this response time required needs to be just fractions of a second for this set up. More than likely this may become a piece of customized hardware.

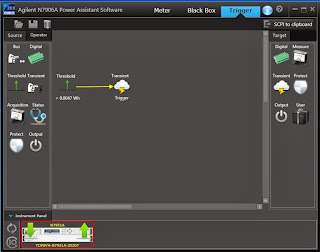
Interestingly this very set up can be programmatically configured within our N6900A and N7900A series Advanced Power System (APS) power supplies. These products have Amp-hour and Watt-hour measurement integrated into their measurement systems. Not only can you measure these parameters, there is a programmable way to act on them in a variety of ways as well, which is the expression signal routing. Logical expressions can be programmed and downloaded into APS, which then acts on them at hardware-level speeds.  Creating and loading the signal routing expression into the APS unit is simplified by using the N7906A Power Assistance software, which let me do it graphically, as shown in Figure 2.


Figure 2: Graphically developing and loading an energy limit setting into an Agilent APS unit

In Figure 2 a threshold comparator was set to generate a trigger output at a level of 0.0047 watt-hours. This trigger was then routed to the output transient system, to cause the output to transition to a new output level when triggered. I had entered in zero volts as the triggered output level. Thus when the watt-hour reading reached its trigger point, the output went to zero, cutting off any more power and energy from being delivered to the DUT.

The SCPI command set for this signal routing expression is also generated from this software utility by clicking on “SCPI to clipboard”. This saves on the effort generating the code manually if you are incorporating the expression into a larger test program. For this expression the code generated is:

:SENSe:THReshold1:FUNCtion WHOur
:SENSe:THReshold1:WHOur 0.0047
:SENSe:THReshold1:OPERation GT
:SYSTem:SIGNal:DEFine EXPRession1,"Thr1"
:TRIGger:TRANsient:SOURce EXPRession1


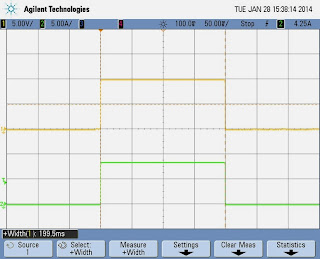
To test things out a 1.18 ohm resistive load was used to draw 84.75 watts for a 10 volt output setting. The output cut back to zero volts at nearly 200 milliseconds, as expected. This is shown in the oscilloscope capture in Figure 3.


Figure 3: APS output for an 84.75 watt load and energy limit set to 0.0047 watt-hours

The load power was then doubled by increasing the output voltage to 14.142 volts. The APS output cut back to zero volts in half the time, delivering the same amount of energy, as expected. This is depicted in the oscilloscope capture in Figure 4.


Figure 4: APS output for a 169.5 watt load and energy limit set to 0.0047 watt-hours

While using a resistor makes it easy to see that a set amount of energy is being delivered to the load. However, being able to act on a real time watt-hour energy measurement makes it very practical to do deliver a fixed amount of energy, regardless of the dynamic nature of the load over time.
Wednesday, October 30, 2013

Protect your DUT from over-current in more ways than one

Last month, I posted about one of our new families of products: the N6900/N7900 Series 1- and 2-kW Advanced Power System (APS) DC Power Supplies (click here). I typically like to post about more general power topics rather than focus on specific Agilent products, but this product has some really interesting features from which you can benefit. After 33 years of working on power here, there aren’t too many new products that get me excited, but this is one of them! So here is a story about an application for it.

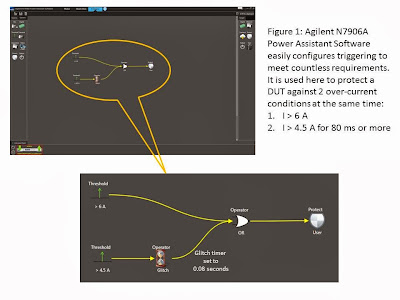
Earlier this month, I visited one of our customers that had a device under test (DUT) whose input was sensitive to too much current. That is typically not a difficult issue to protect against using Agilent power supplies with over-current protection (OCP). Set the current limit to a value that you don’t want to exceed, turn on OCP, and the power supply output will go into protect (turn off) when the current limit value is reached. Simple enough! But this customer had an additional requirement. In addition to an OCP value as just described, he also wanted to shut down the output if the current exceeded a lower current for more than a specified amount of time. So he wanted the power supply output to go into protect (turn off) if either of the following conditions occurred on his DUT (I changed this example to protect his information):

       1.  DUT input current exceeds 6 A for any amount of time, or
       2.  DUT input current exceeds 4.5 A for 80 ms

To be honest, at the time of the visit, I wasn’t sure if our new product could do this. The product is so new and so feature-rich that I am not yet familiar with all of its capabilities. But when I returned to my office, I set it up and found it was very easy to do! Here is the solution:

I used the advanced signal routing and logical trigger expressions built into our N7952A APS to setup both requirements. I could have sent SCPI commands to setup the same trigger configuration, but our free Power Assistant Software (N7906A) made this even easier. Figure 1 shows the software with the configuration.


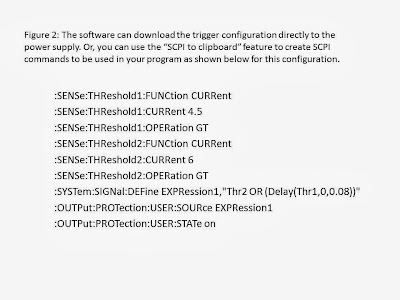
If, after creating the configuration, I want all of the SCPI commands that correspond to it for a program, I could use the software feature “SCPI to clipboard” that creates them from the configuration. See Figure 2.


Take a look at this feature in action. Figure 3 shows a scope trace of the current waveform. As you can see, currents that are less than 4.5 A do not trip the protection. And currents above 4.5 A for less than 80 ms (and below 6 A) also do not trip the protection. But as soon as the current exceeds 4.5 A for 80 ms (and remains below 6 A), the protection tripped – the output shut off causing the current to go to zero amps.


This is just one example of how versatile the N6900/N7900 APS power supplies are. For more information about how these advanced power systems can help you in your power application, please use this link: www.agilent.com/find/aps. To explore this advanced signal routing and logical trigger expressions feature even more, take a look at a post from one of my collegues: http://gpete-neil.blogspot.com/2013/10/protecting-your-dut-during-test-with.html

Monday, September 30, 2013

New Agilent Advanced Power System: More on High-Power!

Last week, I announced two new families of high-power system DC power supplies from Agilent Technologies:
  • N6900/N7900 Series 1- and 2-kW Advanced Power System (APS) DC Power Supplies
  • N8900 Series 5-, 10-, and 15-kW Autoranging DC Power Supplies
Here is the press release on these two new families:

In my post last week, I concentrated on the N8900 Series of autoranging power supplies. Those are basic DC power supplies with outputs up to 15 kW (can be paralleled to 100 kW and more). Today, I am focusing on the N6900/N7900 Series of Advanced Power System DC Power Supplies. These power supplies really do live up to their “Advanced Power System” label. I’ve been working here on power products since 1980 and have supported several feature-rich product families in that time: most notable were our AC source products (6811B, 6812B, and 6813B) and more recently, our battery drain analysis source/measure units (N6705B with N6781A). The new N6900/N7900 Advanced Power System rivals those products for rich features and quite honestly, just like our marketing slogan says, they really should help you “overcome your toughest power test challenges”. Why? Read on…

First the basics:
  • There are ten 1 kW models each in a 1U package
  • There are fourteen 2 kW models each in a 2U package
  • Rated output voltages range from 9 V to 160 V
  • Rated output currents range from 12.5 A to 200 A
  • Outputs can be paralleled up to 10 kW
Here is what these products look like:


Now for a few details. There are two performance levels:
  • N6900 Series is designed for ATE applications where high performance is critical
  • N7900 Series is designed for ATE applications where high-speed dynamic sourcing and measurement is needed
Both performance levels have advanced power features including:

   Sourcing
  • Precision voltage and current programming (N6900 is 14-bit; N7900 is 16-bit)
  • Programmable output resistance
  • Current sinking up to 10% of rated current (up to 100% with added N7909A power dissipator)
   Measurement
  • 18-bit voltage and current measurements
  • Power measurements
  • Amp-Hour and Watt-Hour measurements

The higher performance N7900 products add more features to the above:

    Sourcing
  • Precision 16-bit voltage and current programming (N6900 is 14-bit)
  • Output lists to quickly step through voltage or current levels
  • Arbitrary waveform generation
    Measurement
  • Low current measurement range
  • Seamless ranging for dynamic current measurements
  • Adjustable sample rate
  • Measurement array readback
  • External data logging

And even more capabilities:
  • Extended current measurement range that measures 2.25 x higher than the rated current
  • Sampling up to 200 kS/s
  • Extensive triggering capability
  • Extensive protection features such as open sense lead detect, over- and under-voltage and current, and over-temperature
  • And my personal favorite: you can track power events by adding a black box recorder (N7908A). The N7908A Black Box Recorder is a user-installable option that performs continuous background logging of output voltage, current, power, and system status to its own dedicated mass storage device. Features of this option include:
    • Automatic logging starts when the power supply is turned on
    • Logs in a circular buffer of about 380 MB
    • Select one record every 10 ms (24 hours of logging) or one record every 100 ms (10 days of logging).
    • Each record saves the average, maximum, and minimum  values for voltage, current, and power in addition to power supply status bits and events
    • Logged data is preserved after a power cycle. A time-stamped event is logged each time power is turned on.

The black box recorder is pretty cool, no? If you have a mission critical power application, this option is a must to keep track of any power related events that might affect your device under test.

One of my colleagues, Neil Forcier, posted about these products on his GPETE blog earlier this month. Here is a link to that post: http://gpete-neil.blogspot.com/2013/09/the-new-advanced-power-system-designed.html

For more detailed information, take a look at the datasheet: http://cp.literature.agilent.com/litweb/pdf/5991-2698EN.pdf

The datasheet contains some fantastic details about the products including 9 tests challenges that are directly addressed by these powerful products. In fact, you can read about each of the 9 test challenges here: www.agilent.com/find/TestChallenges

With all of these advanced features built into this family of products, I think you can now appreciate why we called it the Advanced Power System!