Wednesday, January 29, 2014

Using a DC Power Supply to Regulate Energy

In a previous 2-part posting I talked about what power and energy is (part 1 – energy) (part 2 – power).  It is pretty straight-forward thing to do to use a DC power supply for regulating voltage or current. Constant voltage (CV) and constant current (CC) regulation are standard features of most all DC power supplies used in testing. However, what if you have an unusual application calling for applying a fixed amount of energy to your device under test (DUT)? For example, adding a fixed amount of energy to a calorimeter or chemical process, or testing the must (or must not) tripping energy of a fuse, or circuit breaker, or squib or detonator perhaps?

When the resistance of a device remains constant, it is relatively straight-forward to apply a fixed amount of energy to a DUT. By applying a fixed voltage or current, the power in the DUT remains constant. Then the energy is simply:

E = (V2/R)*t = (I2*R)*t

Where E is the energy in watt-seconds or joules, V is voltage in volts, R is resistance in ohms, I is the current in amps, and t is time in seconds. All you now need to do is apply the constant voltage or current for a pre-determined amount of time and you will then be delivering a fixed amount of energy to your DUT.

Many times however, a lot of DUTs do not maintain constant loading. The may have a dynamically varying loading by nature or its resistance dramatically increases as it heats up. How do you regulate a fixed amount of energy to your DUT under these circumstances? One possibility is to use one of a few specialized power supplies on the market can regulate their outputs with constant power. As the DUT’s loading decreases or increases the power supply will adjust its output accordingly in order to maintain a constant output power delivered to the DUT.  Again then, by applying this constant power for a pre-determined amount of time you will then be delivering a fixed amount of energy to your DUT.

Still, for DUTs that do not maintain constant loading, it is very often not desirable, or outright unacceptable, to apply constant power sourcing.. It may be you can only apply a fixed voltage or current to your DUT. What can you do for these circumstances? Time can no longer remain a fixed value when trying to regulate a fixed amount of energy. The solution becomes quite a bit more complex, as depicted in Figure 1.


Figure 1: Regulating a fixed amount of energy to a DUT

Putting the solution depicted in Figure 1 into practice can prove challenging. The watt-hour meter needs to provide a trigger out signal when the desired watt-hour (or watt-second) threshold level is reached. This becomes even more challenging if this response time required needs to be just fractions of a second for this set up. More than likely this may become a piece of customized hardware.

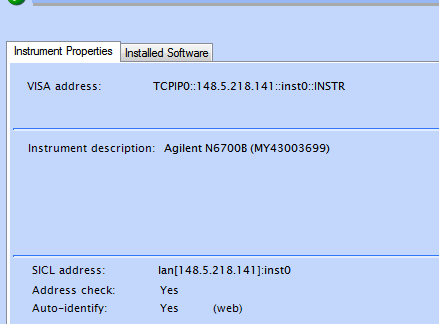
Interestingly this very set up can be programmatically configured within our N6900A and N7900A series Advanced Power System (APS) power supplies. These products have Amp-hour and Watt-hour measurement integrated into their measurement systems. Not only can you measure these parameters, there is a programmable way to act on them in a variety of ways as well, which is the expression signal routing. Logical expressions can be programmed and downloaded into APS, which then acts on them at hardware-level speeds.  Creating and loading the signal routing expression into the APS unit is simplified by using the N7906A Power Assistance software, which let me do it graphically, as shown in Figure 2.


Figure 2: Graphically developing and loading an energy limit setting into an Agilent APS unit

In Figure 2 a threshold comparator was set to generate a trigger output at a level of 0.0047 watt-hours. This trigger was then routed to the output transient system, to cause the output to transition to a new output level when triggered. I had entered in zero volts as the triggered output level. Thus when the watt-hour reading reached its trigger point, the output went to zero, cutting off any more power and energy from being delivered to the DUT.

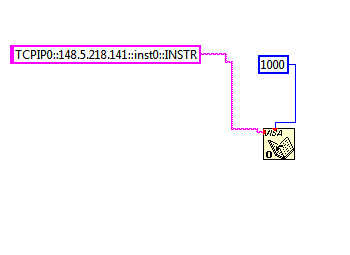
The SCPI command set for this signal routing expression is also generated from this software utility by clicking on “SCPI to clipboard”. This saves on the effort generating the code manually if you are incorporating the expression into a larger test program. For this expression the code generated is:

:SENSe:THReshold1:FUNCtion WHOur
:SENSe:THReshold1:WHOur 0.0047
:SENSe:THReshold1:OPERation GT
:SYSTem:SIGNal:DEFine EXPRession1,"Thr1"
:TRIGger:TRANsient:SOURce EXPRession1


To test things out a 1.18 ohm resistive load was used to draw 84.75 watts for a 10 volt output setting. The output cut back to zero volts at nearly 200 milliseconds, as expected. This is shown in the oscilloscope capture in Figure 3.


Figure 3: APS output for an 84.75 watt load and energy limit set to 0.0047 watt-hours

The load power was then doubled by increasing the output voltage to 14.142 volts. The APS output cut back to zero volts in half the time, delivering the same amount of energy, as expected. This is depicted in the oscilloscope capture in Figure 4.


Figure 4: APS output for a 169.5 watt load and energy limit set to 0.0047 watt-hours

While using a resistor makes it easy to see that a set amount of energy is being delivered to the load. However, being able to act on a real time watt-hour energy measurement makes it very practical to do deliver a fixed amount of energy, regardless of the dynamic nature of the load over time.

Friday, January 24, 2014

Using Binary Data Transfers to Improve Your Test Throughput

From time to time I have shared here on “Watt’s Up?” a number of different ways the system DC power supply in your test set up impacts your test time, and recommendations on how to make significant improvements in the test throughput. Many of these previous posts are based on the first five of ten hints I’ve put together in a compendium entitled “10 Hints on Improving Throughput with your Power Supply” (click here for hints 1-5).

Oscilloscopes, data acquisition, and a variety of other test equipment are often used to capture and digitize waveforms and store large arrays of data during test, the data is then downloaded to a PC. These data arrays can be quite large, from thousands to millions of measurements. For long-term data logging the data files can be many gigabytes in size. These data files can take considerable time to transfer over an instrument bus, greatly impacting your test time.

Advanced system power supplies incorporating digitizing measurement systems to capture waveform measurements like inrush current are no different. This includes a number of system DC and AC power products we provide. Even though you usually have the choice of transferring data in ASCII format, one thing we recommend is instead transfer data in binary format. Binary data transmission requires fewer bytes reducing transfer time by a factor of two or more.


Further details about using binary mode data transfers can be found in hint 7 of another, earlier compendium we did, entitled “10 hints for using your power supply to decrease test time” (click here to access). Between these two compendiums of hints for improving your test throughput I expect you should be able find a few different ideas that will benefit your particular test situation!

Wednesday, January 8, 2014

Keysight Technologies – What’s in a name, anyway?

This is an exciting time for us! Yesterday, January 7, 2014, we learned what our new company name will be: Keysight Technologies. Here is a link to the official press release: 

If you have not heard by now, back in September of 2013, Agilent Technologies announced it would split into two companies by the end of 2014. Since I started in 1980, 33+ years ago, I have worked for and will continue to work for the electronic measurement side of the business. For my first 19 years with the company, we were Hewlett-Packard, a company that formed in 1939 as a test and measurement company and eventually birthed Silicon Valley. It is this electronic measurement side of the business that is getting the new name, just as we did in 1999 when we became Agilent from Hewlett-Packard. The other part of Agilent, the life sciences, diagnostics, and applied markets side will continue to operate under the Agilent name. Note that the electronic measurement side will still have the same great people designing and supporting the same great products and services….just a new name: Keysight Technologies.

So let’s take a closer look at the new name, logo, and tagline for Agilent’s electronic measurement business:


The name combines the words “key”, meaning essential, and “insight” meaning intuitive perception. Essential intuitive perception. Seeing what others cannot. A key can also be used to unlock something; we will continue to unlock measurement insights, as our tagline says. And we have been doing this for 75 years - since the day that Bill Hewlett and Dave Packard released their first electronic test instrument, an audio oscillator, in 1939. By the way, it is purely a coincidence that the Watt’s Up? authors, Ed, Matt, and I have combined experience of more than 75 years as stated in our blog header, although I’d like to think that the three of us have been unlocking measurement insights in the AC and DC power field for a combined total of 75 years! In fact, we now have a total of more than 80 years’ experience between the three of us and I will update the header later this year when we officially begin using the Keysight name. But I digress...

The logo symbol is derived from one of the most fundamental wave shapes there is: a sine wave – a wave shape from which all other wave shapes can be built. This is very appropriate for our 100% focus on electronic measurement, not to mention a tribute to our original founders, Bill and Dave, for their audio oscillator. And the power products and topics that you read about here in Watt’s Up? are equally represented by the logo symbol, especially our AC sources! If you really think about it, Keysight will be doing what Hewlett-Packard originally set out to do and Agilent continued to do for decades: build the world’s leading test and measurement company.

So what’s in a name? Essential intuitive perception is in our name. A clear focus on electronic measurement is in our name. Our strong and deep heritage is in our name. And when we begin to fully operate as Keysight Technologies later this year, what you will find behind our name will be the same high quality products and people that you have come to know. That’s what’s in the name Keysight Technologies!


Tuesday, December 31, 2013

Using Agilent Command Expert to Help Write Programs

Happy New Year everyone!  

I am writing this on New Years Eve 2013 and I want to wish everyone a happy and safe 2014.  Ed, Gary, and I had a goal of getting 4 blog posts out a month this year and with this being the fourth blog post this month, we have met that goal!  Thank you to everyone for taking the time to read our blog.

Today, I am going to provide a short intro to  Agilent Command Expert (hereto referred to as ACE). ACE is a free tool that Agilent offers that helps you program your instruments. You can write simple scripts in ACE that you can save and share with other programmers.  The coolest feature of ACE is that it allows you to export the sequence to different programming languages.   You can find the latest version of Command Expert at: 


Using ACE is pretty easy.  The first thing that you need to do is set up your instrument.  My instrument is an Agilent N6700B.  Here is what the setup/edit screen looks like:  


Once you choose the instrument, ACE will download the command set so you do not need to have the programming guide handy.  This is a great feature since you can easily see all of the commands as well as all of the inputs and outputs of the commands. 

Here is the set voltage screen:


You can see here that it shows you all of the programmable items in the command (in this case the voltage and the channel list).  Once you set everything up as you'd want, click add step and it adds it to the sequence.

You can also do queries with ACE.  Here is how you would do a MEAS:VOLT? query:


Again, it shows you all of the programmable items (in this case only the channel list).  It also shows you that there is returned data.  Click add step to get it added to the sequence.

I am going to continue using the same SCPI command as I used in my example last week, here is completed sequence from the example from last month:


Now for the fun part!  You can export the sequence to just straight SCPI:


To C#:


To C++:


To VB.NET:


To Matlab:


It gives you the option to copy the text to the clipboard so that you can paste it into the text editor for your programming language.  

There is also a tool included that allows you to create sequences in Labview.  There is a really good tutorial included with the software that shows you how to do this.

There is a ton more info on the ACE webpage link at the beginning of this blog post.

I hope that this short intro to Agilent Command Expert was useful to everyone.  Please feel free to leave a comment.  Happy New Year everyone!


Sunday, December 29, 2013

Shower by cell phone and the attitude of gratitude

As I type this, I’m sitting on an airplane, clean, comfortable (as much as that’s possible sitting in economy), clean shaven, well fed, flying home to New Jersey from Frankfurt. Things could have been different…
I started my travels today from a hotel in Sindelfingen, Germany, drove to the Stuttgart airport, and took a short flight to Frankfurt where I connected with this much longer flight home (8.5 hours). I was visiting some of Agilent’s distribution partners in Germany and France over the last ten days to present training on our newest power supply products.

Last night, before I went to sleep, I called the front desk of the hotel to ask for a 6 am wake-up call. I wanted to have time to shower, shave, dress, eat breakfast, check out, gas-up the car, drive to the airport, return the car, exchange my leftover Euros for US dollars, and finally make my morning flight. I also set my new cell phone alarm for the same time (6 am). I recently purchased my first smart phone, so I’m happy to be using its features!

6 am rolls around, my cell phone alarm goes off (yes, I managed to set it correctly), and I wake up momentarily not knowing exactly where I am or what is happening (typical for trips where you change hotels a lot). 5 seconds after the alarm starts its intermittent beeping, I come to my senses in my nearly pitch-black, normally very quiet room. The only light is a dim glow from a tiny LED on the room thermostat and the only sound is a low hum from the heating system fan in between the alarm beeps. 10 seconds after the alarm started beeping, the room suddenly become absolutely pitch-black. No light at all! I wonder if I’m dreaming and I feel like I have completely lost my eyesight! But then I noticed that the heating system fan went from humming to silent, and the thermostat LED is no longer glowing. Totally dark and totally quiet (between phone beeps) with no thermostat LED and no fan? OK, perhaps I’m not dreaming and most likely, this is a power failure! In the absolute darkness, I fumble for my beeping cell phone and manage to push a button on it partially illuminating the screen. I turn off the alarm, and now can see just enough to try the lamp switch next to the bed. Click, click on the lamp….no light. Yeah, definitely a power failure. I know that the cell phone, an Apple 5S, has a flashlight feature that is a nice, bright white LED. Turning that on, I’m now able to easily maneuver around the room. I pick up the room phone, but it is dead. I look outside, and it is dark everywhere. Yep, it’s not just my room, nor is it just the hotel. The power is out everywhere. Guess I won’t be getting my 6 am wake-up call!

Next, it is time to shower. I strategically place the cell phone on the bathroom counter angled just right so the light bounces off the ceiling and I can see reasonably well in the shower. Shaving is a bit more difficult with the limited and oddly angled light, but I manage. Then the lights come back on. Whoo-hoo!  About 10 minutes later, the hotel phone rings and the manager is very apologetic about the wake-up call being 40 minutes late. I tell him “no problem” and explain my phone alarm still woke me on time.
So had my cell phone alarm not awakened me, I may have slept too long resulting in a missed flight. And if I did not have the flashlight feature on the phone, I would not have been able to shower and shave making me more comfortable during a full day of travel. Earlier in my trip, the cell phone GPS also saved my colleague and me by guiding us to our hotel, to the office, and enabling us to find our way back to the hotel after walking around town for lunch.

Cell phones play a very large role in our lives today. While we humans survived the vast majority of our existence without them, smart phones and all electronic technology have vastly changed our lives. While I regularly wonder how my life would have been different had I lived in a time without electricity, today, my smart phone changed my experiences. I could have missed my flight had my cell phone alarm not gone off. I could have been less comfortable during my long travel day had I not been able to shower by cell phone light. Despite a power failure preventing a wake-up call and no light in my hotel room for the early morning, my day was not really disrupted thanks to my cell phone. While these things are minor in the grand scheme of things, I am still grateful for the technology we have that allows us to do the things we do. And I’m glad to be a part of that technology by working with power products. Many cell phone manufacturers use Agilent power products during their design, verification, and manufacturing processes and I am happy to be a part of that chain.

May all of your travels during this holiday season be uneventful…and Happy New Year!

Friday, November 29, 2013

Using Labview without Using an Instrument Specific Driver

Hi everyone!

Labview is presently one of the most popular programming languages for programming test and measurement equipment.   Here at Power and Energy Central, we often get requests for more Labview programming examples for our products (which is definitely something on my agenda).   We also get requests for Labview drivers (which do exist for many of our products).  I thought that I would use this month’s blog posting to demonstrate how to program without using a driver.  There are a few advantages to this approach.  The first and main one is that it gives you access to the full SCPI command set of the instrument.  Anything you can do with the instrument is available to you.  The second advantage is that you do not need to worry about downloading and setting up drivers. 

I am going to work through an example using my Agilent N6700B on LAN.  We are going to use VISA calls in Labview to communicate with the instrument.  The first thing that we are going to need to do is get the VISA init string from the Agilent IO Libraries (or whatever IO Library you are using).  You can see the init string from my N6700B below (from the Agilent IO Libraries):


With the VISA address in hand, start up Labview and choose a blank VI.  Go to the Functions Pallette -> Instrument IO -> VISA ->Advanced and choose Open.  This function will open up a VISA session with your instrument.  There are quite a few inputs to this function but I usually just set up the instrument address and the VISA Open timeout:

After opening a session, we are ready to send our first commands.  I usually like to send a *RST and a *IDN?  so I know that I am in a known state and fully communicating with my instrument.   To send a command, you are going to go to the VISA menu and choose Write.  There are a few lines that you will need to connect here.  In Labview, you will always connect the “VISA Resource Name Out” and “error out” lines through your entire program (you will see that throughout this example).   The command is the other input.  This will need to be a string.  

Since we sent a query, we need to read out the output buffer.  This is done by choosing read in the VISA menu.   You need to do with the read are set the byte count to be read (I set it to 100 bytes so it is totally out of the way).   You also need a string indicator so that you can read and display the results of the *IDN query.


I am going to finish out my program by setting my supply to 4 V, turning the output on, and measuring the voltage.  All of these steps will use the same reads and writes that we used before.  The last thing I will do is use a VISA Close.  Using a Close will de-allocate all the resources and release the instrument.  This is generally good programming practice and is often overlooked.  Here is what the final program looks like:


After I run the completed program, I get the following results:


We can see that the results are as we expected and our program is working.

From this example, you can see that doing simple things is pretty easy in Labview.   If you are interested in downloading the example, please leave a comment here and I will post it so that you can get it.  As always, if you have any questions please feel free to post in our comments.  Take care!


Wednesday, November 27, 2013

Why can’t you put electronic loads in series?

The quick answer to the above question is: because you will likely damage at least one of the loads with excessive voltage! For the longer answer, read on….

[By the way…this is a milestone post for Watt’s Up? since it is post # 100, so thank you to our readers…and Happy Thanksgiving to those in the US or celebrating elsewhere!]

I’ll start with a brief explanation of what an electronic load is, and what it is used for. I am specifically talking about DC electronic loads here. A DC electronic load is a two-terminal electrical instrument that draws power from a DC source. Loads are used to test DC sources. Any device that has a source of DC output power, such as a DC power supply, a DC-to-DC converter, a battery, a fuel cell, or a solar panel, can have power drawn from it with an electronic load. Click here to see Agilent’s DC electronic loads.


For example, to test a fixed-output DC power supply that is rated for 20 V, 5 A, 100 W, you would connect the power supply output to an electronic load with ratings that are equal to or greater than the power supply ratings and that can draw a constant current from the power supply. Since the power supply is regulating the voltage (20 V), the load must regulate the current it draws from the power supply (up to 5 A). If your DC power supply is a constant current source, the load must be capable of drawing power while regulating voltage. You can set most electronic loads to draw power by regulating either constant voltage (CV) or constant current (CC). You can also set many electronic loads to regulate constant resistance (CR) across their input terminals, and some can regulate constant power (CP).

If the power supply to be tested has a higher output voltage than a single electronic load can handle, you may be tempted to put multiple load inputs in series to accommodate the higher voltage. After all, you can do this will power supply outputs to get higher voltage (click here)….why not with loads?

Putting electronic loads in series can cause one of the load inputs to be exposed to a voltage beyond its capabilities that could result in damage to the load. You are putting loads in series because a single load does not have a high enough voltage rating to handle the voltage of your DC power source. But since one of the load inputs could become a low impedance (nearly a short circuit) during test, all of the voltage from your DC source could appear across the other load input in series. There are several scenarios that can result in this destructive situation. To understand these scenarios, you first have to understand how an electronic load works.

Loads work by controlling the conduction of FETs across their input terminals. The control is realized by using a feedback loop to adjust a measured level (such as the input current) so that it equals a reference level (such as the set current). My colleague, Ed Brorein, posted about this topic last year (click here).

When you put multiple electronic loads in series to accommodate higher voltage, one problem scenario occurs when you set both loads to operate in CC mode. You set the same current on both loads. The exact same current flows through both loads (see figure below), but due to small errors in the accuracy of the settings, the real set values will never be exactly equal. Therefore, one of the loads will be trying to draw a higher current (Load 2 in the figure) than the other load (Load 1 in the figure). Since Load 1 will limit the current at the lower value (9.99 A in this example), Load 2 can never attain its real set point (10.01 A in this example). So its internal feedback loop continues to tell the FETs to conduct more and more current until the FETs are fully on looking nearly like a short circuit. This results in nearly all of the power supply voltage appearing across the Load 1 input which can damage it.


If you operate one load input in CC and one in CV, at first this looks like it will result in a stable operating point. However you have to think about how you get to that stable operating point. If you set the loads first before you connect the voltage, before the voltage is applied, the CC load is not satisfied (no current is flowing) so it goes to a short and the CV load is also not satisfied (no voltage is present) so it goes to an open. When the test voltage is applied, all of the voltage initially appears across the open CV load and can damage it. There are other procedures to follow that could temporarily result in a stable operating point (such as slowly increasing the test voltage if you have that ability), but if any fault condition occurs in any of the loads, they try to protect themselves by either turning the FETs on hard (a short) or opening the FETs. In either case, the large destructive voltage will appear across one of the loads in the series connection resulting in damage.

One of my colleagues, Bob Zollo, wrote an article entitled “Why Can’t You Put Electronic Loads In Series To Get More Voltage?” that appeared in Electronic Design on November 4, 2013. For some additional information about this topic, click here to read the article.

So you can see that putting loads in series can too easily result in damage to at least one of the load inputs. I strongly recommend that you do not do it!