Showing posts with label dynamic current. Show all posts

Wednesday, March 11, 2015

Comparing effects of using pulsed and steady state power to illuminate a high brightness LED

I was having a discussion here with a colleague about the merits of powering a high brightness LED (HBLED) using pulsed power versus using steady state DC power.

My opinion was: “Basically, amperes in proportionally equates to light flux out, so you will get about the same amount of illumination whether it is pulsed or DC.”

His argument was: “Because the pulses will be brighter, it’s possible the effective illumination that’s perceived will be brighter. Things appear to be continuous when discrete fixed images are updated at rates above thirty times a second, and that should apply to the pulsed illumination as well!”

I countered: “It will look the same and, if anything, will be less efficient when pulsed!”

So instead of continuing our debate we ran a quick experiment. I happened to have some HBLEDs so I hooked one up to an N6781A DC source measure module housed in an N6705B DC Power Analyzer sitting at my desk, shown in Figure 1. The N6781A has excellent current sourcing characteristics regardless whether it is DC or a dynamic waveform, making it a good choice for this experiment.


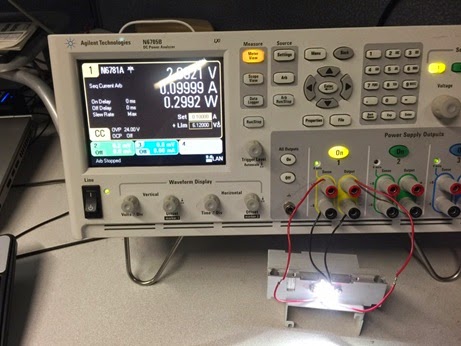
Figure 1: Powering up an HBLED

First we powered it up with a steady state DC current of 100 mA. At this level the HBLED had a forward voltage drop of 2.994 V and resulting power of 0.2994 W, as seen in Figure 2, captured using the companion 14585A control and analysis software.


Figure 2: Resulting HBLED voltage and power when powered with 100 mA steady state DC current

We then set the N6781A to deliver a pulsed current of 200 mA with a 50% duty cycle, so that its average current was 100 mA. The results were again captured using the 14585A software, as shown in Figure 3.


Figure 3: Resulting HBLED voltage and power when powered with 200 mA 50% DC pulsed current

Switching back and forth between steady state DC and pulsed currents, my colleague agreed, the brightness appeared to be comparable (just as I had expected!).  But something more interesting to note is the average current, voltage, and power. These values were obtained as shown in Figure 3 by placing the measurement markers over an integral number of waveform cycles. The average current was 100 mA, as expected. Note however that the average voltage is lower, at 2.7 V, while the average power is higher, at 0.3127 W! At first the lower average voltage together with higher average power would seem to be a contradiction. How can that be?

First, in case you did not notice, the product of the RMS voltage and RMS current are 0.3897 W which clearly does not match our average power value displayed. What, another contradiction? Why is that? Multiplying RMS voltage and RMS current will give you the average power for a linear resistive load but not for a non-linear load like a HBLED. The average power needs to be determined by taking an overall average of the power over time computed on a point-by-point basis, which is how it is done within the 14585A software as well as within our power products that digitize the voltage and current over time. Second, the average voltage is lower because it drops down towards zero during periods of zero current. However it is greater during the periods when 200 mA is being sourced through the HBLED and these are the times where power is being consumed.

So here, by using pulsed current, our losses ended up being 4.4% greater when powered by the comparable steady state current. These losses are mainly incurred as a result of greater resistive drop losses in the HBLED occurring at the higher current level.

There is supposed to be one benefit however of using pulsed power when powering HBLEDs. At different steady state DC current levels there is some shift in their output light spectrum. Using pulsed current provides dimming control while maintaining a constant light spectrum. This prevents minor color shifts at different illumination levels. Although I would probably never notice it!

Wednesday, July 31, 2013

What is Dynamic Current Correction?

Gary and I were talking to one of the design engineers here yesterday about what he worked on recently that might make a good blog post.  We wound up talking about dynamic current correction.  This is an option for the current measurement systems of some of our power supplies.  In order to explain its purpose, let us start with a simplified picture of one of our power supplies:


If you look at the above figure, the current monitor resister is inboard of the output capacitor.   This means that our current measurement system is going to measure both Iout and Ic when we take a current measurement.  Ic is not in any way being sent to the output of the power supply and the DUT will never see this current, the DUT will only see Iout.    We wanted to provide a way that you can see the actual current that is going through the DUT so we offered the Dynamic Current Correction option in our current ranges.  

Since we are talking about a capacitor here, remember that the current through a capacitor equals the capacitance multiplied by the change in voltage over time (I = C * dv/dt).  If you are making a measurement at a DC voltage level, then there is no current through your capacitor since your dv/dt is near zero.  When you have a rapidly changing voltage waveform you can have a large dv/dt and your Ic will be a non-zero number.    A good rule of thumb would be that you want to use the dynamic current correction when you have a changing voltage and you want to turn dynamic current correction off when you have a DC voltage due to reasons that we will get into later.

In the below screenshot from my DC Power Analyzer I am operating an N6762A module set to go from 0 to 50 V with nothing connected to the output.  I do not have the Dynamic Current Correction range selected.


You can see here that the measured current goes up to 1 A even though the output is completely open therefore limiting any current flow.  That current is all flowing through the output capacitor due to the dv/dt of going from 0 to 50 V.  In this screenshot, you are seeing all Ic from the diagram above since Iout is 0.  This is not representative of the DUT current.  In this case we are going to want to use Dynamic Current Correction. 

Keeping everything set the same on the supply I turned the Dynamic Current Correction on and I measured the following waveforms:


As you can see, with Dynamic Current Correction turned on, the effect that the capacitor current has is much less noticeable. With a changing voltage, you definitely want to have this enabled.  

When Dynamic Current Correction is on, the power supply is using the capacitor equation (I= C* dv/dt) to calculate what the capacitor current is and then subtracting the calculated value out of the measured current.  This is a more accurate representation of the output current flowing through the DUT (Iout in the first picture).  There are tradeoffs though.  In some models dynamic current correction will increase the peak to peak current measurement noise and it can also limit the output measurement bandwidth.  These factors are the reason why you should turn it off when you are operating at DC voltages. 

The moral of this blog post is that you want to use the Dynamic Current Correction when you have a rapidly changing voltage and not use it when you have a static voltage.  Please let us know if you have any questions.