Showing posts with label switching power supply. Show all posts

Wednesday, May 15, 2013

Power Factor and Active Power Factor Correction for Switched-mode Power Supplies


In my previous posting “More on Early Power Supply Preregulator Circuits” SCRs served to provide basically line frequency switched-mode operation for efficient power conversion and regulation in earlier mixed-topology DC power supply designs. Now that high frequency switched-mode power conversion circuits have long been highly refined, are physically much smaller, and are extremely cost effective they have become the game-changer. They can be used as a preregulator for mixed-topology DC power supply designs, as well as the complete DC power supply from the AC input to the regulated DC output, right? Well almost “yes”. They do bring all those of benefits over line frequency operation. As they can span a much wider range of AC input another benefit they bring is to eliminate the need for a complex AC line switch arrangement for the wide range of AC voltages needed.

It was recognized that one downside of high frequency switched-mode conversion is the AC input suffered from rather low power factor (PF). PF is the ratio of the real power to the apparent power. Low PFs cause increased losses in the AC power distribution system. Not only was it low, it was very non-linear, drawing current having high levels of odd harmonics. It turns out the third harmonic in particular can be additive, causing excessive current through the neutral line of AC power distribution systems. The reason for the low and non-linear PF is that the AC input of a high frequency switched-mode conversion circuit is a diode bridge feeding a large, high voltage, bulk storage capacitor, as shown in Figure 1. This non-linear load draws large peaks of current over short portions of the AC line period.


Figure 1: Non-linear AC load input of a high frequency switch-mode power converter circuit

As more and more electronic equipment was making use of switch-mode DC power supplies, minimum PF standards were established for products above a certain power rating, to avoid causing problems with the AC power distribution system. To meet the standards switch-mode DC power supplies above a certain power rating have had to incorporate power factor correction (PFC) into their AC inputs. While a few different approaches can be taken for adding PFC, most switch-mode DC power supplies incorporate a specialized switched-mode boost converter stage for providing active PFC. The active PFC stage is placed between the input rectifier bridge and bulk storage capacitor as depicted in Figure 2. An active PFC stage is designed to draw AC current in phase and in proportion to the AC voltage, typically providing PFs in a range of 0.95 to 0.99, which is comparable to a nearly purely resistive load!


Figure 2: Active PFC circuit in typical switched-mode DC power supply

While adding active PFC to a switch-mode DC power supply increases complexity, cost, and power loss somewhat, the overall combination of benefits of a switch-mode DC power supply with active PFC, either stand-alone or as a preregulator, is hard to beat!

Friday, May 10, 2013

More on Early Power Supply Preregulator Circuits


In my last posting “Ferroresonant Transformers as Preregulators in Early DC Power Supplies “, I introduced the concept of preregulators as a means of improving the efficiency of power supplies.  While a linear regulator provides excellent performance as a power supply, it has to dissipate all the additional power resulting from the voltage drop across it as it takes up the difference between the output voltage setting and the unregulated DC voltage at its input. This voltage difference becomes quite large for high-line AC input voltage levels, as well as low DC output voltage settings when the power supply has an adjustable output. A linear power supply becomes quite inefficient and physically large, having to dissipate a lot of power in comparison to what it provides at its output.  A preregulator helps to mitigate this disadvantage while still retaining the performance advantages of a linear output stage.

The ferroresonant transformer was a clever device and was an effective means of compensating for variance in the AC input voltage, but its output was fixed so it did not do anything for compensating for low DC output voltage settings when the power supply had an adjustable output.  A far more common type of preregulator circuit often used was an SCR preregulator circuit, depicted in Figure 1.


Figure 1: Constant voltage power supply with SCR preregulator

The SCR is a four layer diode structure. Unlike a conventional diode it does not conduct in the forward direction until a signal current is applied to its gate input. It then latches on and remains conducting in its forward direction. It does so until the forward bias voltage is removed or reversed and it resets. In the reverse direction it is the same as a conventional diode.  By replacing two of the conventional diodes in the full wave diode bridge with SCRs as shown in Figure 1, the DC voltage feeding into the linear regulator output stage can now be preregulated.  The preregulator control circuit senses the voltage across the series linear regulator output stage. For each half cycle of the line frequency it adjusts the firing angle of the SCRs in order to adjust the DC voltage at the input of the linear regulator so that the voltage across the linear regulator remains constant, compensating for the load and output voltage level setting accordingly. Figure 2 shows how changing the firing angle of the SCRs changes the output voltage and current delivered by the SCR preregulator circuit.


Figure 2: SCR firing angle control of the preregulator’s output

In all, an SCR preregulated power supply with a linear output stage provided a good balance of efficiency, performance, and cost making its topology well suited for DC power supplies for a variety of lab and industrial applications for the time.  Still, time marches on and high frequency switching-based topologies have come to dominate for the most part, due to a number of advantages they bring. As a matter of fact it is not uncommon today to find a switching power supply serving as a preregulator as well!


Reference: Agilent Technologies DC Power Supply Handbook, application note AN-90B, part number 5952-4020 “Click here to access”

Tuesday, April 23, 2013

Ferroresonant Transformers as Pre-regulators in DC Power Supplies


One significant drawback of a linear DC power supply is its efficiency for most applications. You can generally design a linear DC power supply with reasonable efficiency when both the output and input voltage values are fixed. However, when either or both of these vary over a wide range, after assuring the DC power supply will properly regulate at low input voltage and/or high output voltage, it then has to dissipate considerable power the other extremes.

For DC power supplies running off an AC line, having to accommodate a fairly wide range of AC input voltage is a given. A 35% increase in line voltage from the minimum to the maximum value is not uncommon. Today’s high frequency switching based power supplies have resolved the issue of efficiency as a function of input line voltage variance. However, prior to widespread adaptation of high frequency switching DC power supplies, variety of different types of low-frequency pre-regulators were developed for linear DC power supplies

What is a pre-regulator? A pre-regulator is a circuit that provides a regulated voltage to the linear output stage from an unregulated voltage derived from the AC line voltage, with little loss of power. Although not nearly as commonly used as other pre-regulator schemes, on rare occasion ferroresonant transformers were used as an effective and efficient pre-regulator in DC power supplies.

What is a ferroresonant transformer? It is similar to a regular transformer in that it transforms AC voltage through primary and secondary windings. Unlike a regular transformer however, once it reaches a certain AC input voltage level it starts regulating its AC output voltage at a fixed level even as the AC input voltage continues to rise, as depicted in Figure 1. Ferroresonant transformers are also commonly called constant voltage transformers, or CVTs.


Figure 1: Ferroresonant transformer input-output transfer characteristic

The ferroresonant transformer employs a rather unique magnetic structure that places a magnetic shunt leakage path between the primary and secondary windings. This structure is illustrated in Figure 2. This way only part of the transformer structure saturates at a higher fixed peak voltage level during each AC half cycle. When part of the core magnetically saturates, the primary and secondary windings are effectively decoupled. The AC capacitor on the secondary side resonates with existing inductance. This provides the carry-over energy to the load during this magnetically saturated phase, holding up the voltage level. The resulting waveform is a clipped sine wave with a fairly high level of harmonic distortion as a result. Some more modern designs include additional filtering that can bring the harmonic distortion down to just a few percent however.


Figure 2: Ferroresonant transformer structure

A ferroresonant transformer has some very appealing characteristics in addition to output voltage regulation:
  • Provides isolation from line spikes and noise that is normally coupled through on conventional transformers
  • Provides protection from AC line voltage surges
  • Provides carry over during momentary AC line drop outs that are of a fraction of a line cycle
  • Limits its output current if short-circuited
  • Extremely robust and reliable


Because of a number of other tradeoffs it is unlikely that you will find them in a DC power supply today. High frequency switching designs pretty much totally dominate in performance and cost. Ferroresonant transformer design tradeoffs include:
  • Large physical size
  • Relatively expensive and specialized
  • Limited to a specific line frequency as it resonates at that frequency


So, even though you are very unlikely to encounter a ferroresonant transformer in a DC power supply today, it’s interesting to see there still appears to be a healthy demand for ferroresonant transformers as AC line conditioners in a wide range of sizes, up to AC line power utility sizes.  Their inherent simplicity and robustness is hard to beat when long term, maintenance-free, reliable service is paramount, and AC line regulation in many regions around the world cannot be counted on to be well controlled.

Monday, October 15, 2012

Flyback Inverter for Fluorescent Lamp: Part 2, A Little Theory of Operation


In part 1 of this posting “Flyback Inverter for Fluorescent Lamp: Part 1, Making Repairs” a little careful and straightforward troubleshooting and repair brought my friend’s fluorescent lamp assembly back to life again. But a fluorescent lamp has quite a few unique requirements to get it to start up and stay illuminated. How does this flyback converter manage to do these things?

I had first looked around to see if I could find a schematic for this fluorescent lamp assembly, but nothing turned up for me. However, the parts count was low enough, and circuit board large enough, that it was a fairly simple matter to trace out and sketch the inverter’s schematic in fairly short order, as shown in Figure 1.


Figure 1: Fluorescent lamp single-ended flyback inverter circuit


When first powered up the switching transistor is biased on by the 812 ohm resistor, energizing transformer winding W1. This in turn applies positive feedback to the transistor through winding W2, driving it into saturation. There are two mechanisms in the flyback transformer that are critical for making this inverter work:
  • First it has a gapped core. This allows it to store a substantial amount of energy in its magnetic field which in turn gets dumped over to the fluorescent tube through the secondary winding W3 when the transistor turns off and the transformer’s magnetic field collapses.  During this period the winding voltage continues to climb as the magnetic field collapses until the energy can find a place to discharge to, in this case into the fluorescent tube. The voltage is also further increased by the turns ratio of the transformer. This is the “flyback” effect that creates sufficiently high enough voltage to get the fluorescent tube to “strike” or ionize its gas to get it to start conducting and give off illumination, typically many hundreds of volts.
  • As can be seen this inverter is a very simple circuit with a minimum of parts. A second mechanism in the transformer is it is designed to saturate in order to make the inverter oscillate. At the end of the transistor’s “on” period the transformer reaches its maximum magnetic flux at which point the transformer saturates. Winding voltage W2 drops to zero and then reverses driving the switching transistor into cutoff.  After the magnetic field has collapsed and energy discharged to the fluorescent tube the process repeats itself.


The switching transistor’s collector and base voltages during turn on are captured in the oscilloscope diagram shown in Figure 2.


Figure 2: Inverter switching transistor collector and base voltage waveforms

A number of interesting things can be observed in Figure 2.  The oscillation period is roughly 50 microseconds, or oscillation frequency of 20 kHz. It takes about 10 cycles, 500 microseconds, for the fluorescent tube to strike. During this initial phase the peak collector voltage is flying up to nearly 100 volts or about 8 times the DC input voltage being applied. Again, this voltage is being multiplied up by the turns ratio of windings W1 and W2 to bring this up in the vicinity of 600 volts or so needed to make the fluorescent tube to strike. Once the tube does strike and starts conducting its impedance drops. This causes the collector voltage to drop down to about 35 volts which is consistent with the proportion of drop in voltage needed for the fluorescent tube once it’s gas is ionized and is conducting. Note also the collector voltage pulse also widens as it takes a longer time for the energy in the transformer to be dumped when it’s at a lower voltage.

Although this inverter at first glance is a rather simple and minimum viable, minimum parts count circuit, with careful design it can be made to be very efficient. This is where the design of the transformer becomes as much art as science, knowing how the subtle characteristics of the magnetic material and inductive and capacitive parasitics can be used to advantage in contributing to and improving the overall performance of the design.

Anyway, what my friend really cared about is the lamp now works and he is able to put it to good use in his camper!

Thursday, October 4, 2012

Flyback Inverter for Fluorescent Lamp: Part 1, Making Repairs


A friend of mine approached me a while ago asking for some help. The fluorescent lamp assembly for his VW Westfalia camper was dead and, knowing I knew more about electronic devices than he did, figured it was worth challenging me with it.  I was actually happy to do so. Being involved with DC power conversion of a variety of forms I was always a bit curious to learn about how fluorescent lamp assemblies that were powered from low voltage DC worked anyway.

“My lamp does not work; can you look at it for me?”
“I suppose. Did it just stop working? Did you try anything to get it working again?”
“Well, it really never worked for me. I messed around with it a little but it did not help. I may have hooked it up backwards.”
“Why do you think you hooked it up backwards?”
“Well, it did not work so I tried reversing the power connections. That didn’t make it work however.”
“You really should not do that with electronic things!”

I took the lamp home and later when I had chance to look at it carefully I visually identified several problems. Like many other things I have repaired, a lot of the times it is not the device itself but rather a previous owner unintentionally inflicts unnecessary damage on it when attempting to make repairs.  In my friend’s partial defense, someone previously had already made unsuccessful attempts at trying to make it work again, unwittingly making things worse.

Referring to Figure 1 I unanchored the inverter circuit board from the back of the lamp assembly for closer inspection. It was immediately obvious there were problems that would keep it from working:
  • The connectors for the wiring to the fluorescent tube were not making contact.
  • A portion of a circuit board trace where the power feeds in was blown away.


Figure 1: Fluorescent lamp inverter board had obvious problems

Clearly someone had let the smoke out of it that made it work!  After making repairs to these problems I then tried powering it up using a power supply with a current limit to keep things safe. As I expected I was not going to get off that easy. The power supply went right up to its current limit setting. The lamp still did not work. 

The next step was to probe around the circuit board with a DMM.  With the abuse this lamp assembly has been subjected to I suspected the switching transistor would be damaged and sure enough it was measuring shorted. However, after removing it, it seemed to check out good. Probing around on the board again, a diode adjacent to the transistor measured shorted as well. Upon its removal it fell in half as a result of being overheated. I found where the rest of the smoke that makes it work had come out!  I replaced the diode, reinstalled the transistor and remounted the circuit board. Upon applying power again the result was a bit different as shown in Figure 2. I managed to reinstall all the smoke back into it again!


Figure 2: Fluorescent lamp assembly back in working order

While I had a general idea of how it works, now that I had the fluorescent lamp assembly working again I had take the opportunity to make some measurements and study the finer aspects of how it works, which I will cover, coming up in part 2. Stay tuned!

Wednesday, May 16, 2012

What Is Old is New Again: Soft-Switching and Synchronous Rectification in Vintage Automobile Radios


I have to admit I am a bit of a vintage electronics technologist.  One of many pass times includes bringing vintage vacuum tube automobile radios back to life. In working with modern DC sources I’ve seen innovations come about in the past decade for efficient power conversion, including soft switching and synchronous rectification. A funny thing however, for those who have been around long enough, or into vintage technologies like me, is that these issues and somewhat comparable solutions existed up to 70 years ago for automobile radios and other related electronic equipment. What is old is new again!

As we know, vacuum tubes (or valves to many) were to electronics back then as what semiconductors are to electronics today. The problem for portable and mobile equipment was that the vacuum tubes needed typically 100 or more volts DC to operate. They did have high voltage batteries for portable equipment but for automobiles the radio really needed to run off the 6 or 12 volts DC available from the electrical system. The solution: A DC/DC boost converter!

Up until the mid 1950’s most all automobile radios used vacuum tubes biased with high voltage generated from a rather primitive but clever DC/DC boost converter design. The inherent technological challenge was semiconductors did not yet exist to chop up the low-voltage, high-current DC to convert it to high-voltage, low-current DC. Of course if the semiconductors did exist this would all be a moot point! Making use of what was available the DC/DC boost converters employed what were called vibrators, which are a form of a continuously buzzing relay, to chop up the low-voltage DC for conversion. Maybe some of you are familiar with the soft humming sound heard when an original vintage automobile radio is turned on, prior to the vacuum tubes finally warming up and the audio taking over? That humming is the vibrator, the “heart” of the DC/DC boost converter in the radio.

Figure 1 below is an example circuit of vibrator-based DC/DC boost converter in a vintage automobile radio. This is just one of quite variety of different implementations created back then. Two pairs of contacts in the vibrator act in a push-pull fashion to convert the low-voltage DC into a low-voltage AC square wave. This in turn is converted to a high-voltage square wave by the transformer. Because the vibrator is an electro-mechanical device, it is limited in how fast it can switch. Switching frequencies are typically about 100 to 120 Hz. The transformers used are naturally the steel-laminated affairs similar in nature to the transformers used to convert household line voltage in home appliances. Very possibly some radio manufacturers used off- the-shelf appliance transformers in reverse to step up the voltage!  Often a small rectifier vacuum tube, such as a 6X4 (relatively modern, by vacuum tube standards) would be used to convert the high voltage AC to high voltage DC, but in this particular example I am showing here another two pairs of contacts on the secondary side switch simultaneously with the first pairs of contacts to rectify the high voltage AC. Highly efficient synchronous rectification, up to 70 years ago!

Figure 1: Representative DC/DC boost converter for a vintage automobile radio

The clever part of these DC/DC boost converters is making the vibrators last. Let’s see; 100 cycles/second, times 60 seconds/minute, times 60 minutes/hour, times ~2 hours/day, times 365 days/year; that’s 263 million cycles in one year! And while the vibrator was replaceable, it would often last for many years or more, which is quite remarkable. The trick was paying close attention to the switching as to not stress the vibrator‘s contacts. Referring to the waveforms in Figure 2, there is quite a bit of dead time between the non-overlapping switching of the contacts. This was by design. The capacitor across the secondary of the transformer in Figure 1 is carefully matched to ring with the transformer’s inductance such that the voltage is near zero across the alternate set of contacts is just as they’re closing, minimizing arcing and wear. Low-stress soft switching, again, up to 70 years ago! Ironically the cause for the vibrator failing was often due the capacitor degrading with stress and time. The capacitor was actually slightly larger than ideal value at the start to prevent overshoot and allow for aging. When resurrecting a vintage automobile radio frequently the vibrator will still work. Make certain to replace the capacitor first however or the vibrator is bound to have a very short second life.

Figure 2: Switching waveforms in a vibrator-based DC/DC boost converter

These vacuum tube automobile radios with vibrator-based DC/DC boost converters had quite a long run before being displaced, first for a very short period in the later 1950’s by hybrid radios using low voltage vacuum tubes and early germanium power transistors, and then finally overtaken by fully transistorized automobile radios in the early 1960’s.

So my hat’s off to the many design engineers of yesteryear who encountered such challenges, fully understood the principles, and just as creatively came up with solutions for them so long ago, based on what they had available. And again for those seasoned engineers who see such things come around yet once more as a new innovation, who humbly smile to themselves knowing that “what is old is new again”.

By chance are you a vintage electronics technologist?

Thursday, April 19, 2012

Experiences with Power Supply Common Mode Noise Current Measurements

I wrote an earlier posting “DC Power Supply Common Mode Noise Current Considerations” (click here to review) as common mode noise current can be an issue in electronic test applications we face. This is not so much of an issue with all-linear based power supply designs as it can be for ones incorporating switching based topologies. High performance DC power supplies designed for test applications should have relatively low common mode current by design. I thought this would be a good opportunity to get some more first-hand experience validating common mode noise current. The exercise proved to be a bit of an eye-opener. I tried different approaches and, no surprise; I got back seemingly conflicting results. Murphy was busy working overtime here!

I settled on a high performance, switching-based DC source on having a low common mode noise characteristic of 10 mA p-p and 1 mA RMS over a 20 Hz to 20 MHz measurement bandwidth. To properly make this measurement the general consensus here is a wide band current probe and oscilloscope is the preferred solution for peak to peak noise, and a wide band current probe and wide band RMS voltmeter is the preferred solution for RMS noise. As the wide band RMS voltmeters are pretty scarce here I relied on the oscilloscope for both values for the time being. The advantages of current probes for this testing are they provide isolation and have very low insertion impedance.

I located group’s trusty active current probe and oscilloscope. The low signal level I intended to measure dictated using the most sensitive range providing 10 mA/div (with oscilloscope set to 10 mV/div).
One area of difficulty to anticipate with modern digital oscilloscopes is there are a lot of acquisition settings to contend with, all having a major impact on the actual reading. After sorting all of these out I finally got a base line reading with my DC source turned off, shown in Figure 1.

Figure 1: Common mode noise current base-line reading

My base-line reading presented a bit of a problem. With 1 mV corresponding to 1 mA my 2.5 mA p-p / 0.782 mA RMS base-line values were a bit high in comparison to my expected target values. It would be nicer for this noise floor to be at about 10X smaller so that I don’t have to really factor it out. Resorting to the old trick of looping the wire through the current probe 5 times gave me a 5X larger signal without changing the base-line noise floor. The oscilloscope was now displaying 2 mA /div, with 1 mV corresponding to 0.2 mA. In other words my base-line is now 0.5 mA p-p / 0.156 mA RMS. The penalty for doing this is of course more insertion impedance. Now I was all set to measure the actual common mode noise current. Figure 2 shows the common mode noise current measurement with the DC source on.

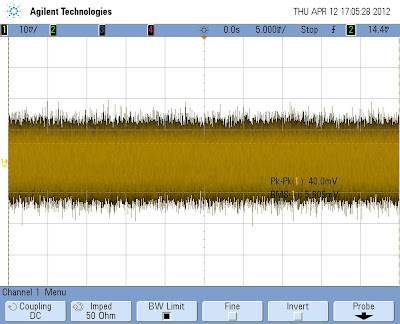
Figure 2: Common mode noise current measurement

Things to pay attention to include checking the current on both + and – leads individually to earth ground and load the output with an isolated load (i.e. a power resistor). Full load most often brings on worst case values. Based on the 0.2 conversion ratio I’m now seeing 8 mA p-p and 1.12 mA RMS, including the baseline noise. I am reasonably in the range of the expected values and having a credible measurement!

I decided to compare this approach to making a 50 ohm terminated direct connection. This set up is depicted in Figure 3 below.

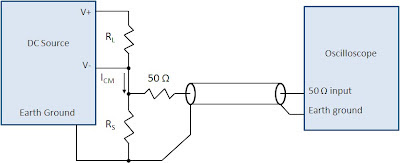
Figure 3: 50 ohm terminated directly connected common mode noise current measurement

I knew insertion impedance was considerably more with this approach so I tried both 10 ohm and 100 ohm shunt values to see what kind of readings I would end up with. Table 1 summarizes the results for the directly connected measurement approach.

Table 1: 50 ohm terminated directly connected common mode noise current results

Clearly the common mode noise current results were nowhere near what I obtained with using a current probe, being much lower, and also highly dependent on the shunt resistor value. Why is that? Looking more closely at the results, the voltage values are relatively constant for both shunt resistor cases. Beyond a certain level of increasing shunt resistance the common mode noise behaves more as a voltage than a current. For this particular DC source the common mode voltage level is extremely low, just a few millivolts.

Not entirely content with the results I was getting I located a different high performance DC source that also incorporated switching topology. No actual specifications or supplemental characteristics had been given for it. When tested it exhibited considerably higher common mode noise than the first DC source. The results are shown in table 2 below.

Table 2: 50 ohm terminated directly connected common mode noise current results, 2nd DC source

With both voltage and current results changing for these two test conditions the common mode noise is exhibiting somewhere between being a noise current versus being a noise voltage. I had hoped to see what the results would be using the current probe but it seemed to have walked away when I needed it!

In Summary:
Making good common mode current noise measurements requires paying a lot of attention to the choice of equipment, equipment settings, test set up, and DUT operating conditions. I still have bit more to investigate but at least I have a much better understanding as to what matters. Maybe in a future posting I can provide what could be deemed as the “golden set up”! To get results that correlate reasonably with any stated values will likely require a set up that exhibits minimal insertion impedance across the entire frequency spectrum. Making directly coupled measurements without the use of a current probe will prove challenging except maybe for DC sources having rather high levels of common mode noise currents

The underlying concern here of course is what is what will be the impact to the DUT due to any common mode noise current from the test system’s DC source. Generally that is any common mode noise current ends up becoming differential mode noise voltage on the DUT’s power input due to impedance imbalances. But one thing I found from my testing is that the common mode noise is not purely a current with relatively unlimited compliance voltage but somewhere between being a noise voltage and noise current, depending on loading conditions. For the first DC source, with what appears to be only a few millivolts behind the current it is unlikely that it would create any issues for even the most sensitive DUTs. For the second DC source however, having 100’s of millivolts behind its current, could potentially lead to unwanted differential voltage noise on the DUT. Further investigation is in order!

Tuesday, December 6, 2011

Should I Use a Switching or Linear DC Power Supply For My Next Test System? (part 4 of 4)

Part 4 of 4: Making the Comparison and Choice
In the first three parts of this post we looked at the topologies and merits of linear DC power supplies, traditional and high-performance switching DC power supplies, and common mode noise current considerations of each. So now in this final part we have reached a point where we can hopefully make an informed comparison and choice. Tables 1 and 2 summarize several key qualitative and quantitative aspects of all three DC power supply types, based on what we have learned.
Table 1: Qualitative comparison of DC power supply topologies

Table 2: Quantitative comparison of DC power supply topologies

So what DC power supply topology is the best choice for your next test system? In the past it usually ended up having to be a linear topology to meet performance requirements in most all but very high power, lower performance test situations. However, high-performance switching DC power supplies have nowadays for the most part closed the performance gap with linear DC power supplies. And, at higher power, the favorable choice may come down to selecting between several different switching DC power supplies only, due to their cost, size, and availability. So the answer is you need to make a choice based on how well the power supply meets your performance, space, and cost requirements, rather than basing the choice on its topology. Except for the most demanding low power test applications, like those needing the performance of a source measure unit (SMU), chances are much higher these days that the next DC power supply you select for your next test system you will be a switcher (and you possibly may not even realize it). What has been your experience?

Tuesday, November 29, 2011

Should I Use a Switching or Linear DC Power Supply For My Next Test System? (part 3 of 4)

Part 3 of 4: DC Power Supply Common Mode Noise Current Considerations
Common mode noise current is a fact of life that manifests itself in many ways in test systems. There are several mechanisms that couple unwanted common mode noise currents into ground loops. An excellent overview on this is given in a two part post on the General Purpose Test Equipment (GPETE) blog “Ground Loops and Other Spurious Coupling Mechanisms and How to Prevent Them” (click here). However this is also an important consideration with our choice of a DC system power supply for testing as they are a source of common mode noise current. This is one area where linear DC power supplies still outperform switching DC power supplies. This can become a concern in some highly noise-sensitive test applications. As shown in Figure 1 the common mode noise current ICM is a noise signal that flows out of both output leads and returns through earth. By nature it is considered to be a current signal due to its relatively high associated impedance, ZCM.

Figure 1: Common Mode Noise Current and Path

Common mode noise current is often much greater in traditional switching DC power supplies. High voltage slewing (dv/dt) of the switching transistors capacitively couples through to the output, in extreme cases generating up to hundreds of milliamps pk-pk of high frequency current. In comparison, properly designed linear DC power supplies usually generate only microamps pk-pk of common mode noise current. It is worth noting even a linear DC power supply is still capable of generating several milliamps pk-pk of common mode noise current, if not properly designed. High-performance switching DC power supplies are much closer to the performance of a linear. They are designed to have low common mode noise current, typically just a few milliamps.

Common mode noise current can become a problem when it shows up as high frequency voltage spikes superimposed on the DC output voltage. This depends on the magnitude of current and imbalance in impedances in the path to the DUT. If large enough, this can become more troublesome than the differential mode noise voltage present. Generally, the microamp level of a linear DC power supply is negligible, while hundreds of milliamps from a traditional switching DC power supply may be cause for concern. Because common mode noise current is often misunderstood or overlooked, one may be left with a false impression that all switching DC power supplies are simply unsuitable for test, based on a bad experience with using one, not being aware that its high common mode noise current was actually the underlying cause.

In practice, at typical levels, common mode noise current often turns out not to be an issue. First, many applications are relatively insensitive to this noise. For example, equipment in telecommunications and digital information systems are powered by traditional switching DC power supplies in actual use and are reasonable immune to it. Second, where common mode noise current is more critical, the much lower levels from today’s high-performance switching DC power supplies makes it a non-issue in all but the most noise sensitive applications.

In those cases where common mode noise current proves to be a problem, as with some extremely sensitive analog circuitry, adding filtering can be a good solution. You can then take advantage of the benefits a switching DC power supply has to offer. A high-performance switching DC power supply having reasonably low common mode current can usually be made to work without much effort in extremely noise-sensitive applications, using appropriate filtering, capable of attenuating the high frequency content present in the common mode noise current. Such filtering can also prove effective on other high frequency noises, including AC line EMI and ground loop pickup. These other noises may be present regardless of the power supply topology.

Coming up next is the fourth and final part where we make our overall comparison and come to a conclusion on which power supply topology is best suited for test.

References:
1. Taking The Mystery Out Of Switching-Power-Supply Noise Understanding the source of unspecified noise currents and how to measure them can save your sanity
By Craig Maier, Hewlett Packard Co. © 1991 Penton Publishing, Inc.

Wednesday, November 23, 2011

Should I Use a Switching or Linear DC Power Supply For My Next Test System? (part 2 of 4)

Part 2 of 4: Switching DC system power supply attributes
In part 1 we looked at the topology and merits of a linear DC power supply. To be fair we now have to give equal time to discuss the topology and merits of a switching DC system power supply, to make a more informed choice of what will better suit our needs for powering up and testing our devices.

Traditional switching DC power supply topology
The basic traditional switching power supply depicted in Figure 2 is a bit more complex compared to a linear power supply:
1. The AC line voltage is rectified and then filtered to provide an unregulated high voltage DC rail to power the following DC-to-DC inverter circuit.
2. Power transistors switching at 10’s to 100’s of kHz impose a high voltage, high frequency AC pulse waveform on the transformer primary (input).
3. The AC pulse voltage is scaled by the transformer turns ratio to a value consistent with the required DC output voltage.
4. This transformer secondary (output) AC voltage is rectified into a pulsed DC voltage.
5. An LC (inductor-capacitor) output filter averages the pulsed voltage into a continuous DC voltage at the power supply’s output.
6. As with a linear power supply, an error amplifier compares the DC output voltage against a reference to regulate the output at the desired setting.
7. A modulator circuit converts the error amplifier signal into a high frequency, pulse width modulated waveform to drive the switching power transistors.


Figure 2: Basic switching DC power supply circuit

In spite of being more complex the key thing is its much higher operating frequency, several orders of magnitude over that of a linear power supply, greatly reduces the size of the magnetic and filtering components. As a result traditional switching DC power supplies have some inherent advantages:
• High power conversion efficiency of typically 85%, relatively independent of output voltage setting.
• Small size and lightweight, especially at higher power.
• Cost effective, especially at higher power.

Traditional switching DC power supplies also have some typical disadvantages:
• High output noise and ripple voltage
• High common mode noise current
• Slow transient response to AC line and DC output load changes.


High-performance switching DC power supplies lessen the gap
Traditional switching DC power supply performance is largely a result of optimizing well established switching topologies for cost, efficiency and size, exactly the areas where linear DC power supplies suffer. Performance generally had been a secondary consideration for switching DC power supplies. However, things have now improved to better address the high-performance needs for electronics testing. Incorporating more advanced switching topologies, careful design, and better filtering, high-performance switching DC power supplies compare favorably with linear DC power supplies on most aspects, while still retaining most of the advantages of switchers.

So our choice on whether to use a linear or switching power supply has now gotten a bit more difficult! One area that still differentiates these DC power supply topologies is common mode current noise, worthy of its own discussion, which is exactly what I will do in part 3, coming up next!

Tuesday, November 15, 2011

Should I Use a Switching or Linear DC Power Supply For My Next Test System? (part 1 of 4)

Part 1 of 4: Linear System DC Power Supply Attributes
To kick things off I thought it would be helpful to start with a short series of posts discussing something fundamental we’re often faced with; that is making the choice of whether to use a switching or linear DC power supply to power up our devices under test. In part 1 here I’ll begin my discussion with the topology and merits of linear DC power supplies, as I have heard countless times from others that only a linear power supply will do for their testing, principally due to its low output noise. Of course we do not want to take the chance of having power supply noise affect our devices’ test results. While I agree a linear DC power supply is bound to have very low noise, a well-designed switching DC power supply can have surprisingly good performance. So the choice may not be as simple anymore. The good thing here however is this may give us a lot more to choose from, something that may better meet our overall needs, including size and cost, among other things.

Linear DC Power Supply Topology
A linear DC power supply as depicted in Figure 1 is relatively simple in concept and in basic implementation:
  1. A transformer scales the AC line voltage to a value consistent with the required maximum DC output voltage level.
  2. The AC voltage is then rectified into DC voltage.
  3. Large electrolytic capacitors filter much of the AC ripple voltage superimposed on the unregulated DC voltage.
  4. Series-pass power transistors control the difference between the unregulated DC rail voltage and the regulated DC output voltage. There always needs to be some voltage across the series pass transistors for proper regulation.
  5. An error amplifier compares the output voltage to a reference voltage to regulate the output at the desired setting.
  6. Finally, an output filter capacitor further reduces AC output noise and ripple, and lowers output impedance, for a more ideal voltage source characteristic.

Figure 1: Basic Linear DC Power Supply Topology

Linear DC power supply design is well established with only incremental gains now being made in efficiency and thermal management, for the most part. Its straightforward configuration, properly implemented, has some inherent advantages:

  • Fast output transient response to AC line and output load changes
  • Low output noise and ripple voltage, and primarily having low frequency spectral content
  • Very low common mode noise current
  • Cost competitive at lower output power levels (under about 500 watts)

It also has a few inherent disadvantages:

  • Low power efficiency, typically no better than 60% at full output voltage and decreases with lower output voltage settings
  • Relatively large physical size and weight
  • High cost at higher power (above about 500 watts)

So it sounds like a linear power supply has to be the hands-down winner especially for low power applications. Or not? To make a more-informed choice we need to look at the topology and merits of a switching power supply, which I will be doing in part 2!